Creamy Peanut Butter Chocolate Reeses Cake Recipe
Reeses cakes represent pure chocolate and peanut butter magic that sparks joy for serious dessert lovers everywhere.
Sweet tooths can’t resist the classic combination of rich chocolate and creamy peanut butter in this decadent treat.
Memories of childhood favorites dance through every delightful bite, promising pure indulgence with each forkful.
Chocolate and peanut butter lovers unite around this spectacular dessert that satisfies the most intense cravings.
Perfect for birthday celebrations, potlucks, or spontaneous weekend baking adventures, these cakes deliver maximum happiness in every slice.
Experienced bakers and kitchen newbies alike can master this crowd-pleasing recipe with confidence and excitement.
Prepare to wow friends and family with a dessert that transforms an ordinary moment into something extraordinary.
What Makes Reeses Cakes A Crowd Favorite
Ingredients Breakdown For Reese’s Mini Cakes
Main Ingredients:Supporting Ingredients:Finishing Ingredients:Everyday Kitchen Equipment Reeses Cakes
Directions for Making Reeses Cakes
Prepare Oven and Pans
Crank up your oven to 350°F. Grab three 6-inch cake pans and give them a generous coat of cooking spray or butter. Line the bottom with parchment paper to make sure your cake layers slide out perfectly.
Mix Dry Cake Ingredients
Grab a large mixing bowl and toss in these dry ingredients:
Whisk everything together until it looks smooth and combined.
Add Wet Ingredients
Create a little well in the center of your dry ingredients. Crack in:
Stir until everything looks well blended.
Finish Cake Batter
Pour in 1/2 cup warm water and mix gently. The batter will look thin – that’s exactly right! Divide the batter evenly between your prepared pans.
Bake Cake Layers
Slide the pans into the preheated oven and bake for 28-32 minutes. Check with a toothpick – it should come out clean when the cakes are done. Let them cool completely on a wire rack.
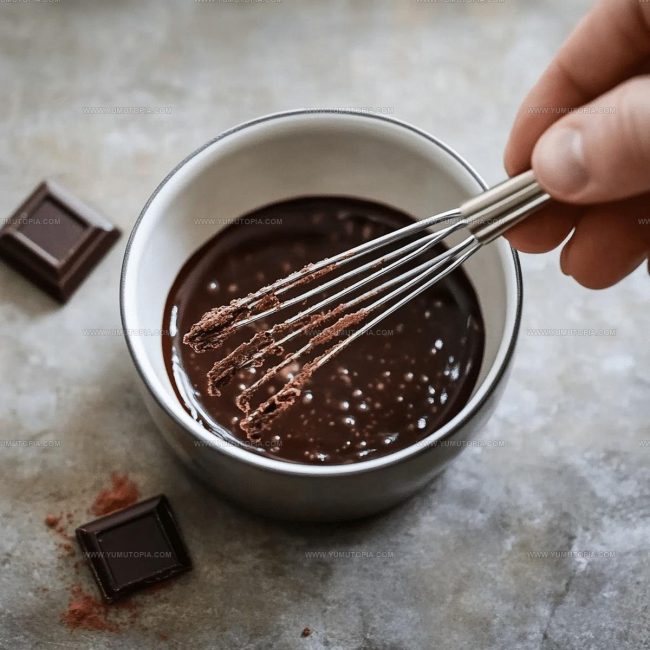
Create Fudge Ripple
Grab a microwave-safe bowl and combine:
Microwave in 30-second intervals, stirring between each, until smooth. Let it cool slightly.
Whip Peanut Butter Frosting
In a mixer, cream together:
Gradually add 3 cups powdered sugar. Mix in 2-3 tablespoons milk, 1 tsp vanilla extract, and a pinch of salt until the frosting feels spreadable.
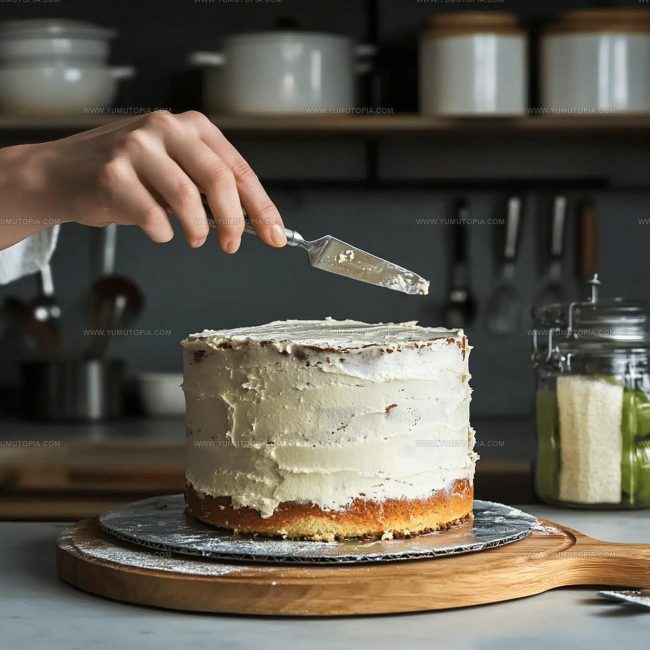
Layer and Fill Cake
Place first cake layer on your serving plate. Pipe a frosting border around the edge and pour some fudge ripple in the center. Add second layer and repeat. Top with final layer.
Frost and Decorate
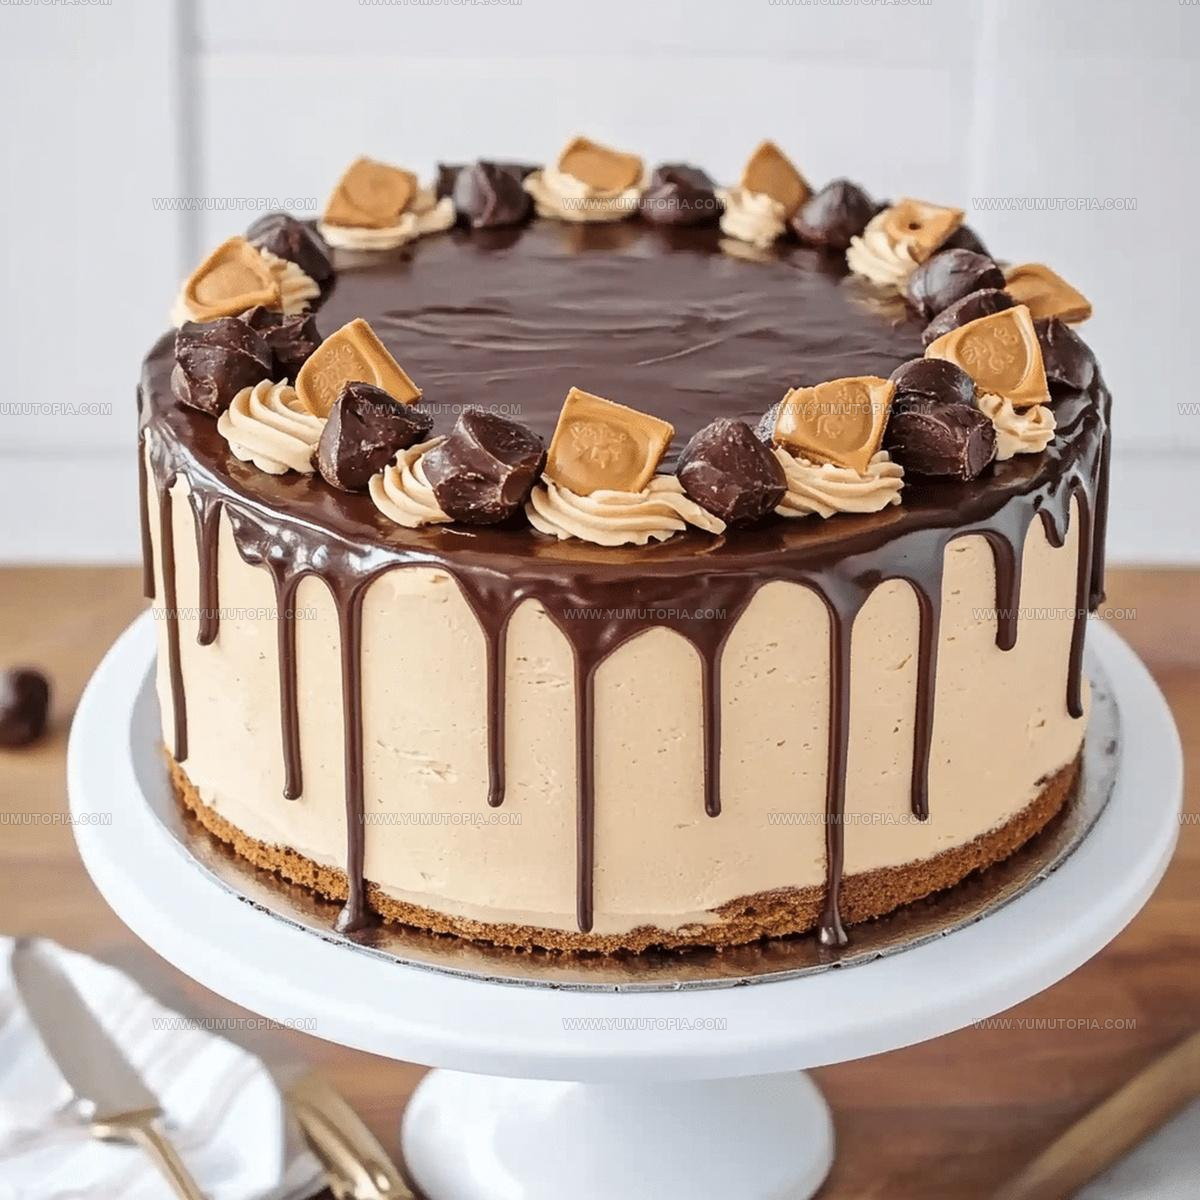
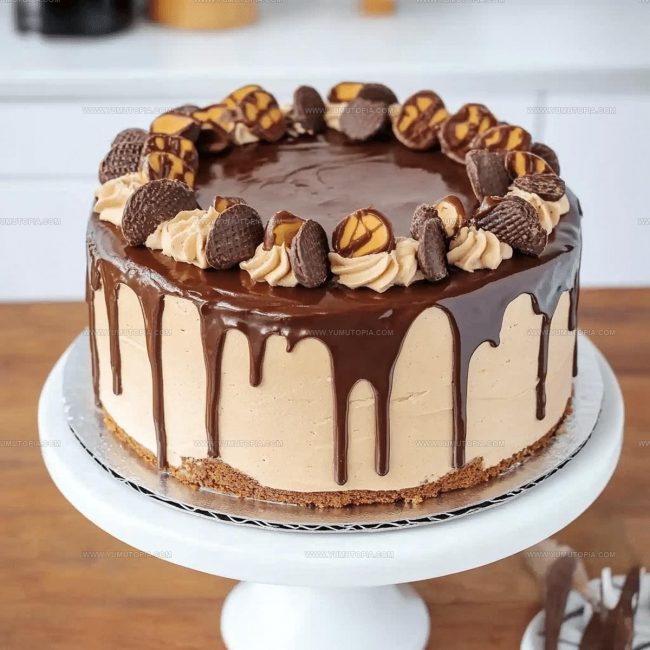
Cover the entire cake with remaining peanut butter frosting. Sprinkle chopped mini Reeses Cups on top. Add Reeses Pieces or chocolate drizzle if you want extra pizzazz.
Notes For Best Results With Reeses Cakes
Creative Variations For Reeses Cakes
Fun Sharing Ideas For Reeses Cakes
Proper Storage For Reese’s Cakes
Reeses Cakes Common Questions
Can I substitute buttermilk?
Heavy cream mixed with a little vinegar or lemon juice works perfectly as a buttermilk replacement.
What chocolate chips work best?
Semi-sweet or milk chocolate chips will create a rich fudge ripple that complements the peanut butter flavor.
How do I get smooth frosting?
Sift your powdered sugar before mixing and beat the butter and peanut butter until completely creamy to prevent lumps.
Can this cake be made gluten-free?
Replace the all-purpose flour with a gluten-free blend that contains xanthan gum for best texture.
How do I prevent dry cake layers?
Avoid overbaking by checking with a toothpick and removing from the oven when it comes out with just a few moist crumbs.
Are Reeses necessary for decoration?
Not at all – chopped peanuts or chocolate shavings work great if you prefer a different topping.

Reeses Cakes Recipe
- Total Time: 43-47 minutes
- Yield: 12 1x
Description
Reeses Cakes are pure chocolate and peanut butter paradise that bring serious dessert excitement to your table. Chocolate layers filled with creamy peanut butter frosting create an irresistible treat perfect for celebrating special moments.
Ingredients
Main Ingredients:
- 1 ¼ cups all-purpose flour
- 1 cup granulated sugar
- ½ cup unsweetened cocoa powder
- ¾ cup unsalted butter
- 1 cup creamy peanut butter
- 2 large eggs
Supporting Ingredients:
- ½ cup buttermilk
- ½ cup warm water
- ¼ cup vegetable oil
- 3 cups powdered sugar
- ¾ cup chocolate chips
- ½ cup sweetened condensed milk
- 23 tablespoons milk or cream
Finishing Ingredients:
- 1 teaspoon baking powder
- ½ teaspoon baking soda
- ½ teaspoon salt
- 1 teaspoon vanilla extract
- 1 pinch salt
- Mini Reeses Cups
- Reeses Pieces (optional)
- Peanut butter chips (optional)
- Chocolate ganache (optional)
Instructions
- Prepare your oven at 350°F and coat three 6-inch cake pans with cooking spray. Ensure your pans are thoroughly greased to prevent sticking.
- Combine 1 ¼ cups flour, 1 cup sugar, ½ cup cocoa powder, 1 tsp baking powder, ½ tsp baking soda, and ½ tsp salt in a mixing bowl. Whisk these dry ingredients until completely blended.
- Add 2 large eggs, ½ cup buttermilk, ¼ cup vegetable oil, and 1 tsp vanilla extract to your dry mixture. Stir until the batter becomes smooth.
- Pour ½ cup warm water into the batter and mix thoroughly. The consistency should be fluid and free of lumps.
- Divide the batter evenly among your prepared pans. Bake at 350°F for 28-32 minutes, checking with a toothpick for doneness.
- Remove cakes from oven and let them cool completely on a wire rack. Cooling is crucial for stable cake layers.
- For the fudge ripple, combine ¾ cup chocolate chips, ½ cup sweetened condensed milk, and a pinch of salt in a microwave-safe bowl.
- Microwave the chocolate mixture in 30-second intervals, stirring between each, until the chocolate melts smoothly. Allow to cool slightly.
- Create the peanut butter frosting by beating ¾ cup room temperature butter with 1 cup creamy peanut butter until light and fluffy.
- Gradually add 3 cups powdered sugar to the butter mixture. Mix in 2-3 tbsp milk, 1 tsp vanilla extract, and a pinch of salt until spreadable.
- Place the first cake layer on your serving plate. Pipe a frosting ring around the edge to create a barrier.
- Spread a layer of fudge ripple inside the frosting ring. Add the second cake layer and repeat the process.
- Top with the final cake layer. Frost the entire exterior of the cake smoothly.
- Decorate the cake’s top and sides with halved mini Reeses Cups. Add optional Reeses Pieces or a chocolate ganache drizzle for extra flair.
Notes
- Cool cake layers completely before assembling to prevent frosting from melting and sliding off the cake.
- Chop Reeses cups just before decorating to keep them fresh and prevent them from getting soft.
- Warm your mixing bowl and beaters slightly before whipping frosting to help create a smoother, more consistent texture.
- Store this cake in the refrigerator, but let it sit at room temperature for 15-20 minutes before serving to enhance the flavors and soften the frosting.
- Prep Time: 15 minutes
- Cook Time: 28-32 minutes
- Category: Cakes
- Method: Baking
- Cuisine: American
Nutrition
- Serving Size: 12
- Calories: 504 kcal
- Sugar: 45 g
- Sodium: 178 mg
- Fat: 30 g
- Saturated Fat: 9 g
- Unsaturated Fat: 19 g
- Trans Fat: 0.3 g
- Carbohydrates: 50 g
- Fiber: 3 g
- Protein: 8 g
- Cholesterol: 52 mg
Logan Lemaster
Founder & Culinary Innovator
Expertise
Recipe Development and Innovation, Menu Design and Optimization, Fine Dining Techniques, Ingredient Pairing and Flavor Science
Education
Metropolitan Culinary Arts Institute
Logan’s culinary journey kicked off in his vibrant Chicago family kitchen, where fresh, seasonal ingredients and bold flavors were always front and center.
After graduating from the Metropolitan Culinary Arts Institute in Arlington, Virginia, and honing his skills in renowned restaurants, Logan mastered the art of blending classic techniques with exciting, modern twists.
His kitchen is a dynamic lab for flavor exploration. Through Yum Utopia, Logan aims to empower you to cook with both confidence and creativity, turning simple ingredients into spectacular meals.