
Reeses Cookie Cups Recipe With Creamy Peanut Butter Centers
Reeses Cookie Cups blend two beloved desserts into one treat that satisfies every sweet craving.
The combination of soft, chewy cookie dough and chocolate peanut butter candy creates a contrast in textures that makes each bite memorable.
Whether for afternoon snacks, holiday gatherings, or weeknight desserts, they work beautifully for any occasion.
They look impressive but come together quickly, making them perfect when you need something special without spending hours in the kitchen.
Everyone reaches for seconds because the flavors complement each other so well.
Baking them gives joy to both the process and the sharing.
When you want something that feels both familiar and exciting, this recipe delivers every time.
Special Features of Reeses Cookie Cups Recipe Everyone Loves
What Makes Reese’s Cookie Cups
Dry Ingredients:Wet Ingredients:Candy Ingredients:What Tools Fill Reese’s Cookie Cups
Directions for Baking Reese’s Cookie Cups
Prep the Oven
Heat the oven to 375°F (190°C). This precise temperature will help your cookies bake perfectly.
Mix Dry Ingredients
Grab a medium bowl and whisk together:
Set this mixture aside while you tackle the next step.
Cream the Butter and Sugars
In a large bowl, grab your electric mixer and blend:
Whip these together for 3-5 minutes until the mixture looks light and fluffy.
Add Wet Ingredients
Drop in 1 large egg and 1 teaspoon vanilla extract. Mix until everything is combined smoothly.
Combine Wet and Dry Ingredients
Slowly add your flour mixture to the wet ingredients. Mix gently until just combined – don’t go crazy with the mixing!
Fold in Reeses Pieces
Stir in 3/4 cup of Reeses Pieces candies. Your dough will look colorful and fun.
Prepare the Muffin Tin
Lightly grease a 24-cup mini muffin tin. This prevents sticky situations later.
Fill the Muffin Cups
Drop rounded tablespoons of cookie dough into each muffin cup. Make sure they’re evenly distributed.
Bake the Cookies
Slide the muffin tin into the 375°F oven for 9-11 minutes. Watch for golden brown edges – that’s your cue they’re nearly done.
Add Peanut Butter Cups
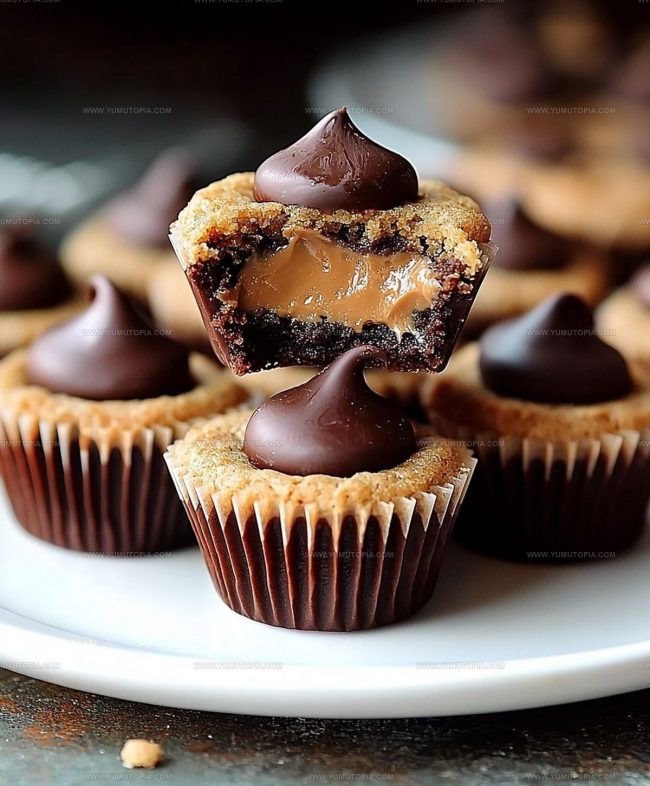
Right after removing from the oven, press a Reeses Miniature Peanut Butter Cup into the center of each warm cookie.
Final Topping
Sprinkle the remaining Reeses Pieces over the tops of the cookies for extra crunch and color.
Cool and Enjoy
Let the cookies rest in the muffin tin for a few minutes. Then transfer them to a wire rack to cool completely. Your delicious treat is ready to devour!
Which Tips Perfect Reese’s Cookie Cups
Which Reese’s Cookie Cup Variations Are Most Popular
Easy Serving Ideas for Reese’s Cookie Cups
Easy Storage Ideas for Reese’s Cookie Cups
Reese’s Cookie Cups FAQs
Can I use different Reeses candies?
Absolutely! Reeses Peanut Butter Cups come in various sizes and flavors. Dark chocolate, milk chocolate, or white chocolate versions work perfectly in this recipe.
What if my dough seems too soft?
Chill the cookie dough in the refrigerator for 30 minutes before scooping. This helps prevent spreading and keeps your cookie cups compact.
Are mini muffin tins necessary?
Mini muffin tins create the perfect cup shape. Regular muffin tins will work, but your cookies will be larger and might need slight adjustment in baking time.
Can the dough be made ahead?
Definitely! Prepare the dough up to 3 days in advance. Store it covered in the refrigerator and bring to room temperature before baking.
How do I get the Reeses Cup to sit perfectly?
Press the chocolate cup gently into the warm cookie immediately after baking. The residual heat helps it settle smoothly without breaking.
What if I don’t have Reeses Pieces?
Standard chocolate chips or chopped peanut butter chips make excellent substitutes in this recipe.

Reeses Cookie Cups Recipe
- Total Time: 24-26 minutes
- Yield: 12 1x
Description
Reese’s Cookie Cups blend peanut butter and chocolate in a delightful treat that brings pure happiness to your dessert table. Baking these little gems guarantees smiles and sweet moments shared with friends and family.
Ingredients
Main Ingredients:
- 1 ½ cups all-purpose flour
- ½ cup unsalted butter
- ½ cup granulated sugar
- ½ cup packed brown sugar
- 1 large egg
Supporting Dry Ingredients:
- ½ teaspoon baking soda
- ¼ teaspoon salt
Flavor and Topping Ingredients:
- 1 teaspoon vanilla extract
- 1 cup Reeses Pieces candies
- 1 bag (10.5 ounces) Reeses Miniature Peanut Butter Cups
Instructions
- Prepare your mini muffin tin by thoroughly coating each cavity with cooking spray at 375F (190C).
- Mix 1 ½ cups flour, ½ teaspoon baking soda, and ¼ teaspoon salt in a medium bowl until evenly combined.
- Cream ½ cup softened butter with ½ cup granulated sugar and ½ cup brown sugar for 3-4 minutes until the mixture becomes pale and fluffy.
- Add 1 large egg and 1 teaspoon vanilla extract to the butter mixture, beating until smooth and fully incorporated.
- Fold dry ingredients into wet ingredients, stirring gently until just combined. Avoid overmixing the dough.
- Carefully fold ¾ cup Reeses Pieces candies into the cookie dough, distributing them evenly throughout.
- Scoop rounded tablespoons of dough into each greased mini muffin cup, filling approximately ⅔ full.
- Bake the cookies at 375F for 9-11 minutes, watching for golden brown edges as your doneness indicator.
- Immediately after removing from the oven, press 1 unwrapped Reeses Miniature Peanut Butter Cup into the center of each warm cookie.
- Sprinkle remaining ¼ cup Reeses Pieces over the tops of the warm cookies for extra crunch and decoration.
- Allow cookies to rest in the muffin tin for 5 minutes to help them set and firm up slightly.
- Transfer cookies to a wire rack and let them cool completely for about 30 minutes before serving.
Notes
- Cold butter makes mixing tough, so always let butter soften at room temperature for smooth, creamy dough.
- Press the Reeses Peanut Butter Cup gently into the warm cookie to help it melt slightly and create a perfect seal.
- Use a mini muffin tin with non-stick coating or generously grease the pan to prevent sticking and ensure easy removal.
- Refrigerate the cookie dough for 30 minutes before baking to prevent spreading and maintain a nice rounded shape.
- Prep Time: 15 minutes
- Cook Time: 9-11 minutes
- Category: Cookies
- Method: Baking
- Cuisine: American
Nutrition
- Serving Size: 12
- Calories: 267 kcal
- Sugar: 21 g
- Sodium: 109 mg
- Fat: 16 g
- Saturated Fat: 7 g
- Unsaturated Fat: 8 g
- Trans Fat: 0.2 g
- Carbohydrates: 26 g
- Fiber: 1 g
- Protein: 4 g
- Cholesterol: 31 mg
Logan Lemaster
Founder & Culinary Innovator
Expertise
Recipe Development and Innovation, Menu Design and Optimization, Fine Dining Techniques, Ingredient Pairing and Flavor Science
Education
Metropolitan Culinary Arts Institute
Logan’s culinary journey kicked off in his vibrant Chicago family kitchen, where fresh, seasonal ingredients and bold flavors were always front and center.
After graduating from the Metropolitan Culinary Arts Institute in Arlington, Virginia, and honing his skills in renowned restaurants, Logan mastered the art of blending classic techniques with exciting, modern twists.
His kitchen is a dynamic lab for flavor exploration. Through Yum Utopia, Logan aims to empower you to cook with both confidence and creativity, turning simple ingredients into spectacular meals.