
Raspberry Zinger Poke Cake Recipe That Captures Childhood Memories
Raspberry zinger poke cake promises pure dessert magic for anyone craving something spectacularly sweet.
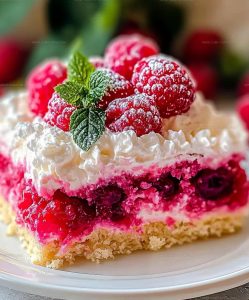
Moist layers of soft cake promise delightful bursts of fruity flavor in every single bite.
Decadent textures and bright raspberry notes create serious crowd-pleasing potential for summer gatherings or special celebrations.
Casual bakers and passionate dessert enthusiasts will adore how simple yet impressive this treat becomes when prepared.
Stunning color and remarkable flavor combination guarantee smiles around the table with minimal effort required.
Unexpected moisture from strategic cake preparation ensures each slice feels rich and luxurious beyond typical dessert expectations.
Serve this gorgeous cake to friends and watch excitement spark faster than you can slice through its delectable layers.
Top Reasons To Try Raspberry Zinger Poke Cake
Main Ingredients For Raspberry Zinger Poke Cake
Cake Base:Raspberry Filling:Whipped Cream Topping:Optional Garnish:Common Cooking Tools for Raspberry Zinger Poke Cake
Easy Way to Make Raspberry Zinger Poke Cake
Bake the Cake
Preheat your oven to 350°F. Grab a 9×13-inch baking pan and prepare the white cake mix following the instructions on the box. You’ll need:
Mix everything until smooth and pour into the pan. Bake for 25-30 minutes until a toothpick comes out clean.
Cool the Cake
Let the cake cool completely on a wire rack. This step is crucial so your filling doesn’t melt when you add it.
Create Poke Holes
Take a fork and poke holes all across the cake surface. Make sure the holes are evenly spaced so every bite gets maximum flavor.
Add Raspberry Filling
Warm 1 cup of raspberry preserves in the microwave for 20-30 seconds until slightly runny. Pour the preserves over the cake.
Gently spread so the preserves seep into all the holes.
Prepare Whipped Cream
In a mixing bowl, whip together the cream topping:
Beat with a mixer until stiff peaks form.
Top the Cake
Spread the whipped cream evenly across the cake surface. Use a spatula to create a smooth finish.
Garnish and Chill
Sprinkle fresh raspberries and mint leaves on top if you want. Refrigerate for 1 hour before serving to let the flavors blend together.
Best Raspberry Zinger Poke Cake Cooking Tips
Different Takes on Raspberry Zinger Poke Cake
Presentation Notes for Raspberry Zinger Poke Cake
What Are The Best Ways To Store Raspberry Zinger Poke Cake
Popular Questions On Raspberry Zinger Poke Cake
Can I use homemade raspberry preserves?
Absolutely! Homemade preserves work wonderfully and can add a more fresh, vibrant raspberry flavor to your cake.
What if raspberries are out of season?
Frozen raspberries work perfectly as a garnish after thawing, or you can swap them with strawberries for a similar fruity touch.
How do I know when the whipped cream is ready?
Look for stiff peaks that hold their shape when you lift the mixer – they should stand up straight without drooping.
Can this cake be made gluten-free?
Swap the regular white cake mix for a gluten-free version, and the rest of the recipe remains the same.
How long will the cake stay fresh?
Stored in the refrigerator, the cake will taste delicious for 3-4 days when covered with plastic wrap.
Can I prepare this cake ahead of time?
Definitely! Make the cake a day before serving, which helps the flavors develop and makes party prep easier.
Retro-Style Raspberry Zinger Poke Cake Recipe
- Total Time: 1 hours 50-55 minutes
- Yield: 12 1x
Description
Raspberry Zinger Poke Cake brings summer vibes right to your dessert plate, with juicy raspberries and creamy layers that make your taste buds dance. Prepare this simple cake when you want a crowd-pleasing treat that feels like a celebration in each delightful bite.
Ingredients
Cake Base:
- 1 box white cake mix
Cake Mix Additional Ingredients:
- Eggs (as specified on package)
- Oil (as specified on package)
- Water (as specified on package)
Filling and Topping:
- 1 cup raspberry preserves
- 1 cup heavy cream
- ¼ cup powdered sugar
- 1 teaspoon vanilla extract
Garnish:
- Fresh raspberries
- Mint leaves
Instructions
- Grab a white cake mix and prepare it exactly according to package instructions, using the recommended eggs, oil, and water quantities. Bake in a 9×13-inch pan at 350°F for 25-30 minutes.
- Allow the cake to cool completely at room temperature for approximately 45-60 minutes.
- Take a fork and poke deep, uniform holes across the entire cake surface. Make holes about 1 inch apart to ensure even raspberry filling distribution.
- Microwave 1 cup raspberry preserves for 20-30 seconds until slightly warm and runny.
- Pour the warm preserves directly over the cake, carefully guiding the liquid into each hole. Use a spatula to help spread evenly.
- Whip 1 cup heavy cream with ¼ cup powdered sugar and 1 tsp vanilla extract using a mixer on high speed for 3-4 minutes until stiff peaks form.
- Spread the whipped cream across the entire cake surface using smooth, consistent motions.
- Optional: Decorate the top with ½ cup fresh raspberries and a few mint leaves for visual appeal.
- Refrigerate the cake for a minimum of 1 hour before slicing to allow flavors to blend thoroughly.
Notes
- Cool the cake completely before poking holes, or the preserves will make the cake soggy and fall apart.
- Use a wooden spoon handle or chopstick to create uniform holes that allow raspberry filling to distribute evenly throughout the cake.
- When whipping cream, start with cold equipment and cream for the most stable and fluffy topping that won’t deflate quickly.
- Fresh raspberries add a beautiful pop of color and bright flavor, but frozen berries work great if fresh aren’t available.
- Prep Time: 20 minutes
- Cook Time: 30-35 minutes
- Category: Cakes
- Method: Baking
- Cuisine: American
Nutrition
- Serving Size: 12
- Calories: 271 kcal
- Sugar: 21 g
- Sodium: 180 mg
- Fat: 14 g
- Saturated Fat: 8 g
- Unsaturated Fat: 5 g
- Trans Fat: 0.2 g
- Carbohydrates: 31 g
- Fiber: 1 g
- Protein: 2 g
- Cholesterol: 50 mg
Logan Lemaster
Founder & Culinary Innovator
Expertise
Recipe Development and Innovation, Menu Design and Optimization, Fine Dining Techniques, Ingredient Pairing and Flavor Science
Education
Metropolitan Culinary Arts Institute
Logan’s culinary journey kicked off in his vibrant Chicago family kitchen, where fresh, seasonal ingredients and bold flavors were always front and center.
After graduating from the Metropolitan Culinary Arts Institute in Arlington, Virginia, and honing his skills in renowned restaurants, Logan mastered the art of blending classic techniques with exciting, modern twists.
His kitchen is a dynamic lab for flavor exploration. Through Yum Utopia, Logan aims to empower you to cook with both confidence and creativity, turning simple ingredients into spectacular meals.