
Classic Red Velvet Cake Roll Recipe for Special Occasions
Red velvet cake roll serves up all the romance and elegance of traditional red velvet in a show-stopping spiral form that looks far more impressive than the effort required.
The soft, velvety texture paired with cream cheese filling makes every bite feel like a celebration, whether you serve it at holidays, birthdays, or weekend gatherings with friends.
Rolling a cake might sound intimidating at first, but the process becomes surprisingly straightforward once you understand the simple technique.
What makes it so appealing is how beautifully it presents on any dessert table, drawing attention and compliments before anyone even takes a taste.
You can prepare it a day ahead, which takes pressure off when hosting and allows flavors to meld perfectly.
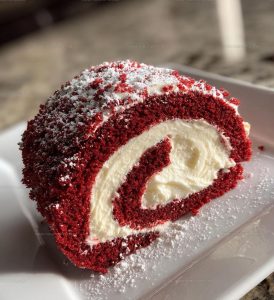
The contrast between the crimson sponge and white filling creates visual drama that feels both classic and modern at once.
Everyone who sees it will assume you spent hours on something complicated when really, the method is quite manageable.
Go bake something beautiful that tastes just as wonderful as it looks.
What Makes Red Velvet Cake Roll So Festive
Ingredients Behind Red Velvet Cake Rolls
Cake Base Ingredients:Wet Ingredients:Frosting Ingredients:What Tools Roll Red Velvet Cake Roll
Baking Instructions for Red Velvet Cake Roll
Prep the Oven and Pan
Crank your oven to exactly 350°F. Grab a 15×10 inch jelly roll pan and give it a quick spray with cooking oil. Line the pan completely with parchment paper, making sure it covers the bottom and sides smoothly.
Mix Dry Ingredients
Grab a medium bowl and combine your dry ingredients carefully:
Whisk these together until they’re perfectly blended.
Whip Up the Wet Mixture
In a separate large bowl, crack 3 large eggs and add 1 cup granulated sugar. Beat the mixture until it looks light and fluffy, almost like a cloud.
Create the Liquid Base
Pour into your egg mixture:
Mix everything until the color is consistent and vibrant.
Combine Wet and Dry
Slowly fold your dry ingredients into the wet mixture. Stir gently until just combined – don’t overmix or the cake will get tough.
Prepare for Baking
Spread the batter evenly across your prepared pan. Use a spatula to make sure it reaches all the corners and looks smooth on top.
Bake the Cake
Slide the pan into the preheated oven. Bake exactly 15-20 minutes. Check doneness by inserting a toothpick – it should come out clean.
Initial Rolling
Immediately after removing from the oven, carefully roll the cake with the parchment paper while it’s still hot. This helps prevent cracking later.
Create the Cream Cheese Frosting
In a bowl, blend together:
Mix until completely smooth and creamy.
Final Assembly
Unroll the cooled cake carefully. Spread the cream cheese frosting evenly across the surface. Gently roll the cake back up without the parchment paper.
Chill and Serve
Refrigerate the cake roll for at least 1 hour to help it set. Slice and serve chilled for the best texture and flavor.
Little Cooking Notes for Red Velvet Cake Roll
Red Velvet Cake Roll Flavor Spins
How to Serve Red Velvet Cake Roll
How to Store Red Velvet Cake Rolls
Red Velvet Cake Roll FAQs
What makes red velvet cake roll different from regular cake?
The cocoa and food coloring create that signature deep red color and subtle chocolate flavor, making this dessert stand out from traditional cakes.
Can cream cheese frosting be made ahead of time?
Absolutely, you can prepare the frosting up to 2 days before rolling the cake and store it covered in the refrigerator.
How do experts prevent the cake from cracking when rolling?
Rolling the cake while it’s still warm and using parchment paper helps prevent cracking and ensures a smooth, beautiful roll.
Why do some red velvet cake rolls look more vibrant than others?
The amount of food coloring determines the intensity of the red color, so adjust according to your preference for a deeper or lighter shade.
What is the best way to slice a cake roll neatly?
Use a sharp, clean knife and wipe the blade between each cut to get smooth, precise slices.
Can this cake roll be frozen for later enjoyment?
Yes, you can wrap the cake roll tightly in plastic wrap and freeze it for up to 2 months, making it perfect for advance preparation.
Rolled Red Velvet Cake Roll Recipe
- Total Time: 1 hours 35-40 minutes
- Yield: 8 1x
Description
Red Velvet Cake Roll delivers pure delight with your first sweet, creamy slice. Smooth cream cheese filling nestled inside tender red cake makes this dessert a total crowd-pleaser for any special moment.
Ingredients
Main Ingredients:
- 3 large eggs
- 1 cup all-purpose flour
- 1 cup granulated sugar
- 1 cup cream cheese, softened
Supporting Ingredients:
- ½ cup vegetable oil
- ½ cup powdered sugar
- ¼ cup unsweetened cocoa powder
Finishing Ingredients:
- 1 tablespoon red food coloring
- 1 teaspoon baking powder
- 1 teaspoon vanilla extract
- ½ teaspoon vanilla extract
- ½ teaspoon baking soda
- ¼ teaspoon salt
Instructions
- Preheat your oven to 350°F and position the rack in the center. Thoroughly coat a 15×10 inch jelly roll pan with cooking spray, then line it precisely with parchment paper.
- Sift together 1 cup all-purpose flour, ¼ cup cocoa powder, 1 teaspoon baking powder, ½ teaspoon baking soda, and ¼ teaspoon salt into a medium bowl.
- Grab your electric mixer and beat 3 large eggs and 1 cup granulated sugar for 3-4 minutes until the mixture becomes pale and dramatically increases in volume.
- Whisk ½ cup vegetable oil, 1 teaspoon vanilla extract, and 1 tablespoon red food coloring into the egg mixture until the color is completely uniform.
- Gently fold the dry ingredients into the wet mixture using a rubber spatula. Mix just until no flour streaks remain, being careful not to deflate the batter.
- Pour the batter into the prepared pan and spread it evenly to the edges using an offset spatula. Tap the pan on the counter to release any air bubbles.
- Bake for exactly 12-15 minutes at 350°F, checking with a toothpick for doneness. The cake should spring back when lightly touched.
- Remove the cake immediately and dust a clean kitchen towel with powdered sugar. Invert the hot cake onto the towel and carefully peel off the parchment paper.
- While the cake is still warm, roll it up inside the towel starting from the short end. Allow the cake to cool completely at room temperature for about 30 minutes.
- Prepare the cream cheese filling by beating 1 cup softened cream cheese, ½ cup powdered sugar, and ½ teaspoon vanilla extract until silky smooth.
- Carefully unroll the cooled cake and spread the cream cheese filling evenly, leaving a small border around the edges to prevent overflow.
- Reroll the cake without the towel, using gentle pressure to create a tight spiral. Wrap in plastic wrap and refrigerate for at least 1 hour before serving.
Notes
- Always use room temperature ingredients to ensure smooth mixing and better cake texture.
- Roll the cake while it’s still hot to prevent cracking and help it maintain a perfect spiral shape.
- For a softer cream cheese frosting, let the cream cheese sit at room temperature for about 30 minutes before mixing.
- If you prefer a less sweet version, reduce the powdered sugar in the frosting and add a touch of lemon zest for brightness.
- Prep Time: 20 minutes
- Cook Time: 15-20 minutes
- Category: Cakes
- Method: Baking
- Cuisine: American
Nutrition
- Serving Size: 8
- Calories: 335 kcal
- Sugar: 31 g
- Sodium: 180 mg
- Fat: 20 g
- Saturated Fat: 5 g
- Unsaturated Fat: 14 g
- Trans Fat: 0.2 g
- Carbohydrates: 38 g
- Fiber: 2 g
- Protein: 6 g
- Cholesterol: 75 mg
Logan Lemaster
Founder & Culinary Innovator
Expertise
Recipe Development and Innovation, Menu Design and Optimization, Fine Dining Techniques, Ingredient Pairing and Flavor Science
Education
Metropolitan Culinary Arts Institute
Logan’s culinary journey kicked off in his vibrant Chicago family kitchen, where fresh, seasonal ingredients and bold flavors were always front and center.
After graduating from the Metropolitan Culinary Arts Institute in Arlington, Virginia, and honing his skills in renowned restaurants, Logan mastered the art of blending classic techniques with exciting, modern twists.
His kitchen is a dynamic lab for flavor exploration. Through Yum Utopia, Logan aims to empower you to cook with both confidence and creativity, turning simple ingredients into spectacular meals.