
Peanut Butter Cottage Cheese Cheesecake Cups Recipe
Peanut butter cottage cheese cheesecake cups have become a sensation for anyone seeking a dessert that feels indulgent without the guilt.
Creamy and satisfying, they hit that sweet spot between wholesome and decadent.
Perfect for meal prep or last-minute cravings, each portion-controlled serving means no need to slice or share unless you want to.
The combination works beautifully because both components contribute richness and protein while maintaining a lighter profile than traditional desserts.
Busy weeknights, post-workout treats, or afternoon pick-me-ups all benefit from having something delicious waiting in the fridge.
Anyone can appreciate how simple preparation leads to impressive results that look bakery-worthy in individual servings.
Most people find themselves reaching for seconds because the flavor profile satisfies without feeling heavy.
Make room in your fridge for a dessert that proves healthy choices can be absolutely delicious.
Why Peanut Butter Cheesecake Cups Feel Worth Making
Peanut Butter Cottage Cheese Cheesecake Cups Ingredients
Base Ingredients:Crust Ingredients:Kitchen Tools Used for Peanut Butter Cottage Cheese Cheesecake Cups
How to Make Peanut Butter Cottage Cheese Cheesecake Cups

Prepare Graham Cracker Base
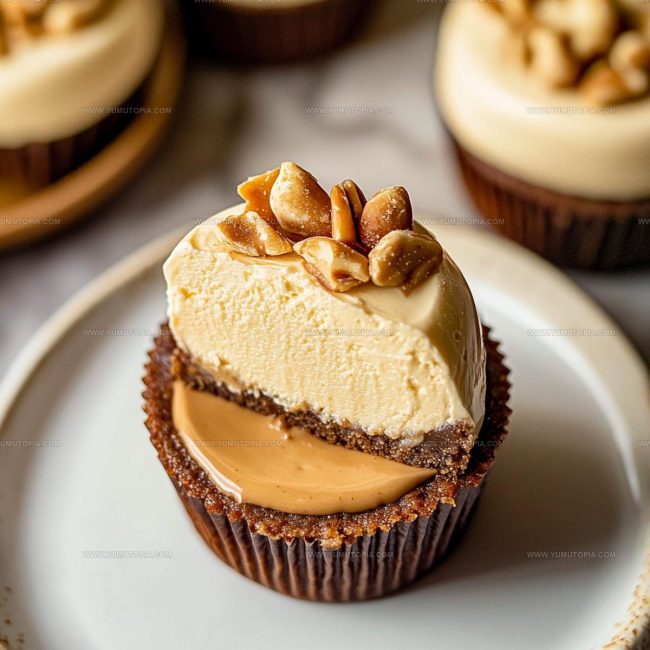
Grab a mixing bowl and toss in your graham cracker crumbs. Pour in the melted butter and mix until the crumbs feel like damp sand. Press this mixture firmly into the bottom of small cups or ramekins, creating a solid foundation for your cheesecake treats. Make sure to distribute the crust evenly across 4 tbsp of melted butter and 1 cup of graham cracker crumbs.
Bake the Crust
Slide your cups into a preheated oven at 350°F. Bake the crusts for exactly 8 minutes until they turn a lovely golden brown. Once done, pull them out and let them cool completely at room temperature.
Create the Creamy Filling
Grab another bowl and prepare to blend your dreamy filling. You’ll want to combine these ingredients carefully:
Whip these together until the mixture becomes completely smooth and looks like a silky dream.
Fill the Cups
Gently spoon the creamy filling over your cooled crusts. Use a spatula to smooth the tops, making sure each cup looks neat and tidy.
Chill and Set
Tuck your cheesecake cups into the refrigerator for at least 2 hours. This resting time lets the flavors meld and the texture set perfectly. When ready, these little dessert cups are ready to devour and enjoy!
Secrets for Peanut Butter Cottage Cheese Cheesecake Cups
Flavor Ideas for Peanut Butter Cottage Cheese Cheesecake Cups
Best Ways to Serve Peanut Butter Cottage Cheese Cheesecake Cups
How to Store Peanut Butter Cottage Cheese Cheesecake Cups
Peanut Butter Cottage Cheese Cheesecake Cups Frequently Asked Questions
Can I use low-fat cottage cheese?
Absolutely! Low-fat cottage cheese works perfectly and helps reduce overall calories without compromising taste or texture.
Do graham crackers need to be name-brand?
Any graham cracker brand or even graham-style cracker will create a delicious crust. Grab whatever is available in your pantry.
What if my peanut butter is chunky?
Smooth or chunky peanut butter both work great. Chunky adds extra texture, while smooth creates a more uniform filling consistency.
How long can these cheesecake cups stay refrigerated?
Sealed and chilled, these cups will keep well for 3-4 days. Just cover them with plastic wrap to maintain freshness.
Can I freeze these cheesecake cups?
Freezing works wonderfully! Wrap each cup individually in plastic wrap, then store in a freezer-safe container for up to one month.
Are these cups gluten-free friendly?
Replace graham crackers with gluten-free graham-style crackers or almond flour crust to make the entire recipe gluten-free.

Simple Peanut Butter Cottage Cheese Cheesecake Cups Recipe
- Total Time: 2 hours 18 minutes
- Yield: 4 1x
Description
Creamy peanut butter cottage cheese cheesecake cups deliver a protein-packed dessert that comes together faster than your sweet tooth can protest. Smooth cheesecake goodness swirls with rich peanut butter, creating a delightful treat your taste buds will absolutely adore.
Ingredients
Main Ingredients:
- 1 cup low-fat cottage cheese
- ½ cup natural peanut butter
Binding/Sweetening Ingredients:
- ¼ cup honey or maple syrup
- 1 tsp vanilla extract
Crust Ingredients:
- 1 cup graham cracker crumbs
- 4 tablespoons melted butter
Instructions
- Preheat your oven to 350°F. Combine 1 cup graham cracker crumbs with 4 tablespoons melted butter in a mixing bowl until the mixture feels like damp sand.
- Press the crumb mixture firmly into 6 small ramekins or cups, creating an even bottom layer about ¼ inch thick.
- Bake the graham cracker crusts for exactly 8 minutes until the edges turn a light golden brown. Remove and let them cool completely at room temperature.
- In a clean bowl, blend 1 cup cottage cheese, ½ cup natural peanut butter, ¼ cup honey, and 1 teaspoon vanilla extract using a hand mixer until the mixture becomes completely smooth and creamy.
- Carefully spoon the peanut butter cottage cheese mixture over the cooled crusts, using a spatula to create an even surface.
- Refrigerate the cheesecake cups for a minimum of 2 hours to allow them to set and develop a firm texture.
- Before serving, let the cups sit at room temperature for 5 minutes to soften slightly and make them easier to enjoy.
Notes
- Swap honey with maple syrup for a different flavor profile that complements the peanut butter perfectly.
- Use low-fat cottage cheese and natural peanut butter to create a lighter, healthier dessert option.
- Ensure cottage cheese is at room temperature to blend more smoothly and prevent lumpy texture in the filling.
- Refrigerate cups for up to 3 days, covering with plastic wrap to maintain freshness and prevent flavor absorption from other foods.
- Prep Time: 10 minutes
- Cook Time: 8 minutes
- Category: Cheesecakes
- Method: Baking
- Cuisine: American
Nutrition
- Serving Size: 4
- Calories: 420 kcal
- Sugar: 18 g
- Sodium: 250 mg
- Fat: 28 g
- Saturated Fat: 8 g
- Unsaturated Fat: 17 g
- Trans Fat: 0.5 g
- Carbohydrates: 25 g
- Fiber: 3 g
- Protein: 15 g
- Cholesterol: 40 mg
Logan Lemaster
Founder & Culinary Innovator
Expertise
Recipe Development and Innovation, Menu Design and Optimization, Fine Dining Techniques, Ingredient Pairing and Flavor Science
Education
Metropolitan Culinary Arts Institute
Logan’s culinary journey kicked off in his vibrant Chicago family kitchen, where fresh, seasonal ingredients and bold flavors were always front and center.
After graduating from the Metropolitan Culinary Arts Institute in Arlington, Virginia, and honing his skills in renowned restaurants, Logan mastered the art of blending classic techniques with exciting, modern twists.
His kitchen is a dynamic lab for flavor exploration. Through Yum Utopia, Logan aims to empower you to cook with both confidence and creativity, turning simple ingredients into spectacular meals.