
Snickerdoodle Apple Pie Bars Recipe with Cinnamon Sugar
Snickerdoodle apple pie bars bring two beloved desserts together in one convenient, handheld treat that’s perfect for any occasion.
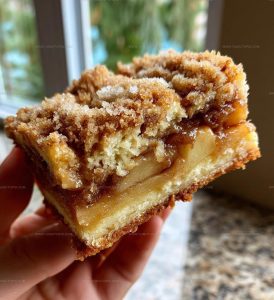
The cinnamon-sugar coating meets fruit-filled goodness in a way that feels both familiar and exciting at the same time.
Bake sales, potlucks, and holiday gatherings all become more memorable when you show up with a pan of something so comforting and crowd-pleasing.
There’s something special about desserts that combine textures and flavors in every single bite, creating an experience that keeps people coming back for more.
The best part is how simple it becomes to serve a group without dealing with plates and forks, making cleanup as easy as enjoyment.
These bars also travel well, so you can pack them up for picnics, office parties, or care packages without worrying about presentation.
When fall flavors meet cookie-inspired sweetness, the result is pure satisfaction that works beautifully across seasons and settings.
Scroll down for the full recipe and see just how simple it is to make something that looks and tastes absolutely impressive.
Why Snickerdoodle Apple Pie Bars Taste Like Fall
Ingredient Rundown for Snickerdoodle Apple Pie Bars
Dry Ingredients:Wet Ingredients:Apple Filling:Topping:Which Baking Tools Handle Apple Pie Bars?
Preparation Guide for Snickerdoodle Apple Pie Bars
Prepare the Oven
Heat the oven to 350°F and grab a 9×13-inch baking pan. Grease the pan thoroughly with butter or cooking spray.
Make the Dry Mixture
Grab a medium bowl and whisk together:
Set this mixture aside while you work on the next step.
Create the Butter Base
In a large mixing bowl, beat 1 cup softened unsalted butter with 1 1/2 cups sugar until the mixture looks creamy and smooth. This takes about 3 minutes with an electric mixer.
Add Wet Ingredients
Crack 2 large eggs into the butter mixture, then pour in 1 teaspoon vanilla extract. Mix until everything is well combined and looks completely blended.
Combine Wet and Dry Mixtures
Slowly add the dry ingredients to the butter mixture. Stir gently until just combined – don’t overmix the batter.
Prepare Apple Filling
In another bowl, toss together:
Layer the First Dough
Press half of the dough evenly into the bottom of the prepared baking pan. Make sure it covers the entire surface.
Add Apple Layer
Spread the apple mixture carefully over the first layer of dough, creating an even coating.
Top with Remaining Dough
Drop spoonfuls of the remaining dough over the apple layer. It’s okay if there are some gaps – this creates a rustic look.
Add Cinnamon Topping
Sprinkle 1/4 cup of sugar mixed with extra cinnamon over the entire surface of the bars.
Bake to Perfection
Slide the pan into the preheated oven and bake for 30-35 minutes. You’ll know it’s done when the top turns a beautiful golden brown.
Cool and Slice
Remove from the oven and let the bars cool completely in the pan. This helps them set up and makes cutting easier. Slice into squares and serve.
How to Enhance Snickerdoodle Apple Pie Bars
Sweet Snickerdoodle Apple Pie Bars Alternative Versions
Serving Inspiration For Snickerdoodle Apple Pie Bars
Snickerdoodle Apple Bars Storage Tips
Snickerdoodle Apple Pie Bars Common Questions
What does a snickerdoodle apple pie bar taste like?
These bars combine the warm cinnamon flavor of snickerdoodle cookies with sweet, tender baked apples in a soft, buttery crust that melts in your mouth.
Can I use different types of apples?
Absolutely! Granny Smith, Honeycrisp, or Fuji apples work perfectly. Choose apples that hold their shape when baking and provide a nice balance of sweetness and tartness.
Do I need any special baking tools?
Just basic kitchen equipment like mixing bowls, a baking pan, measuring cups, and a whisk or electric mixer. Nothing fancy required to make these delicious bars.
How do I know when the bars are fully baked?
Look for a golden brown top and edges that have slightly pulled away from the pan’s sides. The center should be set but still soft when you touch it.
Can I freeze these bars?
Definitely! Wrap the bars tightly in plastic wrap and store in a freezer-safe container for up to 3 months. Thaw at room temperature before serving.
Are these bars good for breakfast?
While technically a dessert, these bars make an incredible breakfast treat with coffee or tea. The apple and cinnamon combination is perfect for morning enjoyment.
Snickerdoodle Apple Pie Bars Recipe
- Total Time: 50-55 minutes
- Yield: 9 1x
Description
Snickerdoodle apple pie bars bring together the warm cinnamon magic of classic cookies with the comforting essence of apple pie in a delightful handheld treat. Your family will devour these sweet, crumbly bars that combine the best of two beloved desserts in one irresistible bite.
Ingredients
Main Ingredients:
- 3 cups apples
- 2 cups all-purpose flour
- 1 ½ cups sugar
- 1 cup unsalted butter
- 2 large eggs
Supporting Ingredients:
- ¼ cup brown sugar
- ¼ cup sugar for topping
- 1 tablespoon lemon juice
- 1 tablespoon flour
- 1 teaspoon vanilla extract
Spices and Seasonings:
- 2 teaspoons cinnamon
- 1 teaspoon baking powder
- ½ teaspoon baking soda
- ½ teaspoon salt
Instructions
- Warm your oven to 350F and grab a 9×13 inch baking dish. Coat the pan with cooking spray to prevent sticking.
- Whisk 2 cups flour, baking powder, baking soda, salt, and cinnamon in a medium bowl until perfectly blended.
- Beat 1 cup softened butter and 1 ½ cups sugar in a separate large bowl until the mixture transforms into a creamy, smooth consistency.
- Crack 2 large eggs into the butter mixture and pour in 1 teaspoon vanilla extract. Blend thoroughly until everything incorporates seamlessly.
- Gradually fold dry ingredients into the wet mixture. Stir until the dough looks uniform and no flour streaks remain.
- Press half the dough firmly into the bottom of your prepared baking pan, creating an even base layer.
- Peel and chop 3 cups apples, then toss them with 1 tablespoon lemon juice, ¼ cup brown sugar, 1 tablespoon flour, and 1 teaspoon cinnamon.
- Spread the seasoned apple mixture evenly across the first dough layer, ensuring complete coverage.
- Take spoonfuls of remaining dough and drop them randomly over the apple layer, creating a rustic, textured top.
- Mix ¼ cup sugar with additional cinnamon and generously sprinkle the mixture across the entire surface.
- Place the pan in the preheated oven and bake for 32-35 minutes, watching for a golden-brown color and slightly crisp edges.
- Remove from oven and allow the bars to cool completely on a wire rack before slicing into squares.
Notes
- Use room temperature butter and eggs for a smoother, more even dough that blends easily.
- Slice apples thinly and evenly to ensure consistent baking and prevent soggy spots in the bars.
- For a gluten-free version, swap regular flour with a cup-for-cup gluten-free baking blend and check that all other ingredients are gluten-free.
- Sprinkle extra cinnamon sugar topping right after baking for a crisp, sweet crust that adds delightful texture to your bars.
- Prep Time: 20 minutes
- Cook Time: 30-35 minutes
- Category: Dessert Bars
- Method: Baking
- Cuisine: American
Nutrition
- Serving Size: 9
- Calories: 297 kcal
- Sugar: 25 g
- Sodium: 105 mg
- Fat: 13 g
- Saturated Fat: 8 g
- Unsaturated Fat: 5 g
- Trans Fat: 0.3 g
- Carbohydrates: 43 g
- Fiber: 1.5 g
- Protein: 2.5 g
- Cholesterol: 40 mg
Madison Wyman
Recipe Developer & Food Storyteller
Expertise
Recipe Research and Adaptation, Food Writing and Cultural Storytelling, Sustainable and Ethical Sourcing, Dietary Adaptations (e.g., gluten-free, plant-based)
Education
Oregon Health & Science University
Portland Community College
Madison’s passion for flavor and culture ignited amidst the rich Southern cooking traditions of her upbringing, where cherished family recipes told delicious tales.
Armed with a Master’s in Food Systems and Society from Oregon Health & Science University and a Culinary Arts Certificate from Portland Community College, Madison truly excels at transforming rich, intricate flavors into dishes that are both approachable and heartfelt.
For her, cooking is a vibrant blend of science, art, and heritage – a powerful way to connect us to our roots and each other. Her recipes invite you to delve deeper, uncovering the fascinating stories woven into every ingredient.