
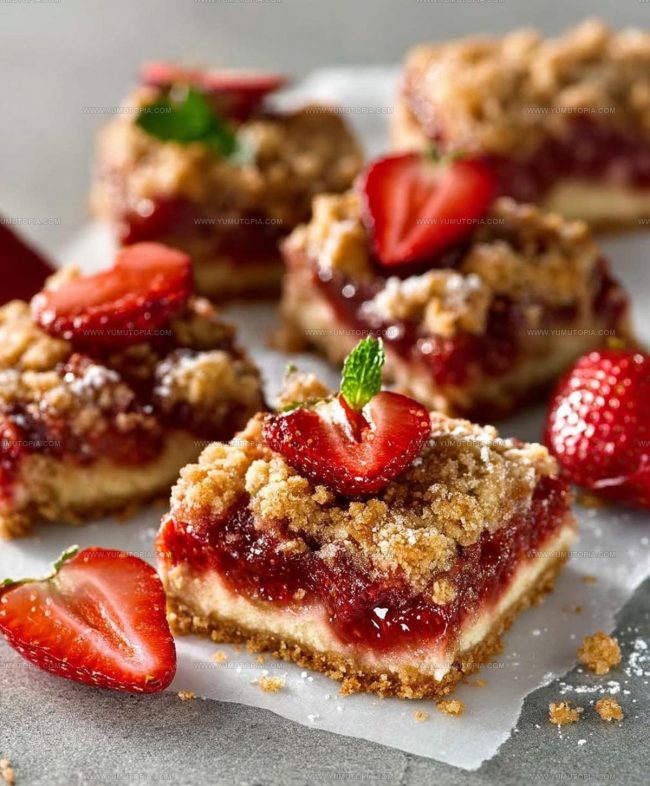
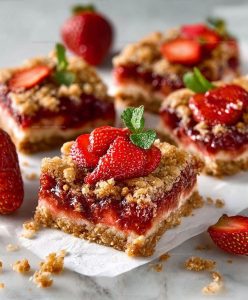
Strawberry Bars Recipe That Captures Summer in Every Bite
Strawberry bars bring together buttery layers and sweet fruit in one handheld dessert that works for any occasion.
Whether hosting a summer gathering or packing lunch boxes, bars offer convenience without sacrificing flavor.
The combination of textures creates something truly satisfying, crisp edges meet soft centers in every bite.
Making bars at this time of year means using fresh produce when it’s most abundant and flavorful.
There’s something special about desserts that look impressive but come together with minimal fuss.
Bars can be cut into any size, making them adaptable for everything from casual snacks to elegant plated desserts.
Most people find themselves coming back for seconds when presented with fruit-filled treats that balance sweetness perfectly.
Best Reasons to Bake Strawberry Bars
Ingredient Breakdown for Strawberry Bars
Crust Ingredients:Filling Ingredients:Crumble Topping Ingredients:Tools to Slice and Bake Strawberry Bars
Baking Instructions for Strawberry Bars
Prepare Crust Dough
Grab a large mixing bowl and toss in 1 1/2 cups flour, 1/2 cup powdered sugar, and 1/4 teaspoon salt. Whisk these dry ingredients together until they’re well combined. Chunk up 1/2 cup cold butter into small cubes and drop them into the flour mixture. Use your fingertips or a pastry blender to break down the butter until the mix looks like rough breadcrumbs. Sprinkle in ice water, one tablespoon at a time, mixing gently. Stop adding water when the dough just barely holds together.
Chill Dough
Shape the dough into a flat disc, wrap it in plastic, and park it in the refrigerator for 30 minutes to chill out.
Prepare Baking Pan
Heat the oven to 375°F. Roll out the chilled dough to fit a 9×13 inch baking pan. Transfer the dough carefully, pressing it evenly across the bottom and slightly up the sides. Poke some fork holes in the bottom of the crust.
Prebake Crust
Slide the pan into the preheated oven and bake for 15-20 minutes until the crust turns a light golden brown.
Prepare Strawberry Filling
While the crust bakes, slice 4 cups of fresh strawberries. In a bowl, mix the strawberries with:
Let the mixture sit and get juicy for about 10 minutes.
Create Crumble Topping
In another bowl, combine:
Add 1/2 cup cold butter cubes and work them into the dry ingredients until you have coarse crumbs.
Assemble Bars
Pull the prebaked crust from the oven. Pour the strawberry filling evenly across the surface. Sprinkle the crumble topping all over the fruit.
Bake Bars
Return the pan to the 375°F oven and bake for 30-35 minutes. You’re looking for a golden-brown crumble top and bubbling fruit filling.
Cool and Serve
Remove the pan from the oven and let the bars cool completely in the pan. Once they’re at room temperature, slice into squares and serve.
Best Tips for Strawberry Bars
Sweet Strawberry Bar Variations to Try
How to Serve Strawberry Bars
How to Store Strawberry Bars Firm
Strawberry Bars Questions Answered
Can I use frozen strawberries instead of fresh ones?
Frozen strawberries work great! Thaw them first and drain any excess liquid to prevent a soggy bottom crust.
How do I know if the dough is ready when mixing?
The dough should look like coarse crumbs and hold together when you pinch it. Don’t overmix or your crust will be tough.
What if my butter is too warm?
Cold butter is key for a flaky crust. If your butter gets soft, pop it back in the refrigerator for 10-15 minutes before cutting it into the flour.
Can I make these bars ahead of time?
Absolutely! Prepare the bars and store them in an airtight container at room temperature for 2-3 days or refrigerate for up to a week.
How do I get clean, neat cuts when serving?
Let the bars cool completely, then use a sharp knife wiped clean between each cut for smooth, precise squares.
Strawberry Bars Recipe
- Total Time: 1 hour 35 minutes – 1 hour 45 minutes
- Yield: 8 1x
Description
Strawberry bars bring pure joy straight from your kitchen, combining fresh fruit and buttery crust into a delightful dessert that sings of summer. Grab some ripe strawberries and get ready to create a simple treat your family will absolutely adore.
Ingredients
Main Ingredients:
- 4 cups fresh strawberries
- 1 ½ cups all-purpose flour
- 1 cup unsalted butter
Supporting Ingredients:
- ¾ cup granulated sugar
- ½ cup powdered sugar
- ½ cup packed light brown sugar
- ½ cup rolled oats
Flavor Enhancers:
- ¾ cup all-purpose flour
- 3 tablespoons cornstarch
- 1 tablespoon lemon juice
- ½ teaspoon vanilla extract
- ½ teaspoon ground cinnamon
- ¼ teaspoon salt
- 2–4 tablespoons ice water
Instructions
- Mix 1 ½ cups flour, ½ cup powdered sugar, and ¼ teaspoon salt in a large mixing bowl until thoroughly combined.
- Cut ½ cup cold, cubed butter into the flour mixture using your fingertips until the texture resembles coarse breadcrumbs.
- Add 2-4 tablespoons ice water gradually, stirring gently until the dough barely holds together.
- Shape the dough into a flat disc, wrap in plastic, and refrigerate for 30 minutes at 40°F.
- Heat your oven to 375°F and roll the chilled dough to fit a 9×13 inch baking pan.
- Transfer the dough to the pan, pressing it evenly across the bottom and slightly up the sides. Poke several holes in the dough with a fork.
- Bake the crust at 375°F for 15-20 minutes until light golden brown.
- Slice 4 cups of fresh strawberries into even pieces.
- Combine strawberries with ¾ cup granulated sugar, 3 tablespoons cornstarch, 1 tablespoon lemon juice, and ½ teaspoon vanilla extract.
- Allow the strawberry mixture to rest for 10 minutes, letting the flavors meld.
- Mix ¾ cup flour, ½ cup brown sugar, ½ cup rolled oats, and ½ teaspoon cinnamon in a separate bowl.
- Cut ½ cup cold, cubed butter into the dry ingredients until crumbly.
- Remove the pre-baked crust from the oven and spread the strawberry filling evenly across the surface.
- Sprinkle the crumble topping uniformly over the strawberry layer.
- Bake at 375°F for 30-35 minutes until the topping turns golden and the filling bubbles.
- Let the bars cool completely in the pan for at least 1 hour before slicing.
- Cut into square servings and enjoy at room temperature.
Notes
- Chill the dough thoroughly to ensure a flaky, tender crust that won’t shrink during baking.
- Let strawberries macerate with sugar before adding to the filling, which helps release their natural juices and intensify the fruit flavor.
- Use cold butter and work quickly when making the crumble topping to achieve a crisp, crumbly texture that won’t become dense.
- For a gluten-free version, substitute the all-purpose flour with a gluten-free blend and use certified gluten-free oats in the crumble topping.
- Prep Time: 50 minutes
- Cook Time: 45-55 minutes
- Category: Dessert Bars
- Method: Baking
- Cuisine: American
Nutrition
- Serving Size: 8
- Calories: 213
- Sugar: 14 g
- Sodium: 42 mg
- Fat: 10 g
- Saturated Fat: 6 g
- Unsaturated Fat: 4 g
- Trans Fat: 0 g
- Carbohydrates: 29 g
- Fiber: 2 g
- Protein: 2 g
- Cholesterol: 30 mg
Logan Lemaster
Founder & Culinary Innovator
Expertise
Recipe Development and Innovation, Menu Design and Optimization, Fine Dining Techniques, Ingredient Pairing and Flavor Science
Education
Metropolitan Culinary Arts Institute
Logan’s culinary journey kicked off in his vibrant Chicago family kitchen, where fresh, seasonal ingredients and bold flavors were always front and center.
After graduating from the Metropolitan Culinary Arts Institute in Arlington, Virginia, and honing his skills in renowned restaurants, Logan mastered the art of blending classic techniques with exciting, modern twists.
His kitchen is a dynamic lab for flavor exploration. Through Yum Utopia, Logan aims to empower you to cook with both confidence and creativity, turning simple ingredients into spectacular meals.