
Strawberry Lemonade Cake Recipe With Summer Sweetness
Strawberry lemonade cake layers bring together two beloved warm-weather flavors in one show-stopping dessert that feels like sunshine on a plate.
There’s something magical about combining fruit-forward sweetness with bright citrus notes, creating a balance that never feels too heavy or overly sugary.
This dessert works beautifully for birthday celebrations, summer gatherings, or any occasion that calls for something special and memorable.
The combination appeals to anyone who loves desserts that taste as refreshing as they look, offering a departure from standard vanilla or chocolate options.
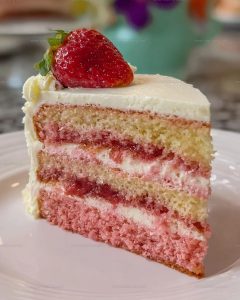
Building flavors into separate layers creates visual drama while ensuring every bite offers maximum impact.
What makes this dessert truly stand out is how it manages to feel both elegant and fun at the same time, sophisticated enough for adults yet approachable for younger dessert fans too.
When you want a cake that sparks conversation and leaves everyone asking for seconds, look no further than this stunning layered creation.
Highlights of Strawberry Lemonade Cake Layers
Strawberry Lemonade Cake Layers Ingredient List
Cake Layers:Lemon Simple Syrup:Lemon Cream Cheese Frosting:Essential Tools for Strawberry Lemonade Cake Layers
Strawberry Lemonade Cake Layer Instructions

Prep the Oven
Warm up the oven to exactly 325°F. Grab three 8-inch cake pans and get them ready by greasing, flouring, and lining with parchment paper.
Mix Dry Ingredients
Whisk together the dry ingredients to ensure they’re perfectly combined:
Prepare Wet Ingredients
In a separate bowl, blend your liquid mixture:
Cream the Base
In your mixer, cream together the creamy base until it’s super smooth:
Gradually add 2 cups sugar and beat for about 2-3 minutes until it’s light and fluffy.
Add Eggs
Drop in 4 large eggs one at a time, mixing until each disappears completely. If you want a pretty pink color, now’s the time to add a touch of pink gel coloring.
Combine Mixtures
Carefully mix your dry and wet ingredients into the creamy base. Start and end with flour, alternating between dry and wet ingredients. Mix just until everything comes together smoothly.
Bake the Layers
Divide the batter evenly between your prepared pans. Slide them into the 325°F oven and bake for 28-30 minutes. Check with a toothpick – it should come out clean. Let the cakes rest in the pans for 5-10 minutes before moving to a wire rack.
Create Lemon Syrup
In a saucepan, combine:
Bring to a boil, then lower heat. Stir until sugar dissolves completely. Remove from heat and add:
Let it cool down.
Whip Up Frosting
Blend softened butter until smooth. Gradually mix in:
If the frosting gets too soft, pop it in the refrigerator for a bit.
Layer and Fill
Place the first cake layer on your serving plate. Brush with lemon syrup if you’d like. Spread frosting and add thinly sliced strawberries between each layer.
Crumb Coat
Cover the entire cake with a thin layer of frosting. Chill for 10-15 minutes to set.
Final Decoration
Frost the cake completely. Use a cake comb or piping tips for fancy details. Garnish with fresh strawberries and lemon wedges. Refrigerate and bring to room temperature before serving.
Easy Tips For Building Strawberry Lemonade Cake Layers
Strawberry Lemonade Cake Layer Remixes
Bright Ways to Serve Strawberry Lemonade Cake
How to Store Strawberry Lemonade Cake Layers
Strawberry Lemonade Cake Layers Common Questions
Can I use frozen strawberries for the puree?
Fresh strawberries work best, but thawed frozen strawberries can work if you drain excess liquid carefully and pat them dry before pureeing.
Why does the recipe use cake flour instead of all-purpose flour?
Cake flour creates a lighter, softer texture because it has less protein, which means less gluten development and a more delicate crumb in your cake.
How ripe should the strawberries be for this recipe?
Choose bright red, fragrant strawberries that are fully ripe but not mushy. Overripe strawberries can make your puree too watery.
What if I don’t have strawberry extract?
You can substitute with pure vanilla extract, though the strawberry flavor will be less pronounced. Fresh strawberry puree will still provide good fruit flavor.
Do I need a stand mixer for this recipe?
A hand mixer works fine, but a stand mixer makes the process easier, especially when gradually adding sugar and mixing ingredients.
Can this cake be made ahead of time?
Absolutely! Bake the cake layers, wrap them tightly, and refrigerate for 2-3 days or freeze for up to a month before assembling.
Strawberry Lemonade Cake Layers Recipe
- Total Time: 48-55 minutes
- Yield: 12 1x
Description
Strawberry lemonade cake brings summer sunshine right to your dessert plate, with zesty citrus and sweet berry flavors dancing together in perfect harmony. Baking this refreshing treat means creating a memorable slice that connects family and friends around the table.
Ingredients
Cake Layers:
- 3 cups (342g) cake flour
- 2 cups (400g) sugar
- 4 large eggs
- 1 cup (243g) strawberry puree
- 8 oz (226g) cream cheese
- 1 ½ sticks (168g) unsalted butter
- ¼ cup (54g) vegetable oil
- 2 teaspoons (8g) baking powder
- 2 teaspoons (8g) strawberry extract
- ½ teaspoon (3g) baking soda
- ½ teaspoon (3g) salt
- A touch of pink coloring gel
Lemon Simple Syrup:
- ½ cup sugar
- ⅓ cup water
- 3 tablespoons lemon juice
- Zest of 1 lemon
Lemon Cream Cheese Frosting:
- 7 ½ cups (863g) confectioners’ sugar
- 3 sticks (339g) unsalted butter
- 8 oz (226g) cream cheese
- ¼ cup (57g) lemon juice
- 1 ½ teaspoons (6g) lemon extract
- Zest of 1 lemon
Decoration:
- 10 fresh strawberries
- Thinly sliced wedges of lemon
Instructions
- Warm the oven to 325°F. Grease three 8-inch cake pans with butter, dust with flour, and line bottoms with parchment paper.
- Whisk 3 cups cake flour, 2 teaspoons baking powder, ½ teaspoon baking soda, and ½ teaspoon salt in a medium bowl for 30 seconds.
- Combine ¼ cup vegetable oil, 1 cup strawberry puree, and 2 teaspoons strawberry extract in a separate bowl.
- Beat 8 oz cream cheese and 1½ sticks butter in a mixer until smooth and creamy at medium speed.
- Gradually add 2 cups sugar to the butter mixture. Mix for 2-3 minutes until light and fluffy.
- Add 4 eggs one at a time, mixing until each yolk disappears completely. Stir in pink gel coloring if desired.
- Slowly mix dry ingredients and strawberry mixture into the batter. Start and end with flour, making 3 dry and 2 wet additions. Mix until just combined.
- Divide batter evenly across three prepared pans. Bake at 325°F for 28-30 minutes until a toothpick comes out clean.
- Remove cakes from oven and cool in pans for 10 minutes. Transfer to a wire rack to cool completely.
- Create lemon syrup by boiling ½ cup sugar and ⅓ cup water. Remove from heat, add 3 tablespoons lemon juice and zest. Let cool.
- Prepare frosting by blending 3 sticks softened butter until smooth. Gradually add 8 oz cream cheese and 7½ cups confectioners’ sugar.
- Mix in ¼ cup lemon juice, 1½ teaspoons lemon extract, and lemon zest to the frosting. Refrigerate if it becomes too soft.
- Place first cake layer on a serving plate. Brush with cooled lemon syrup.
- Spread frosting over the first layer. Arrange thinly sliced strawberries on top.
- Repeat layering process with second and third cake layers.
- Apply a thin crumb coat of frosting over entire cake. Chill for 15 minutes.
- Frost cake completely, using piping tips or a cake comb for decorative texture.
- Garnish with fresh strawberries and lemon wedges. Refrigerate until serving, then bring to room temperature.
Notes
- Check strawberry puree consistency before mixing, ensuring it’s smooth and free of large chunks for an even cake texture.
- Room temperature ingredients blend more evenly, so let eggs, butter, and cream cheese sit out 30-45 minutes before starting.
- For gluten-free adaptation, swap cake flour with a 1:1 gluten-free flour blend and add 1/2 teaspoon xanthan gum for better structure.
- When slicing fresh strawberries for layering, use a sharp knife and pat berries dry to prevent excess moisture from making cake layers soggy.
- Prep Time: 20-25 minutes
- Cook Time: 28-30 minutes
- Category: Cakes
- Method: Baking
- Cuisine: American
Nutrition
- Serving Size: 12
- Calories: 513 kcal
- Sugar: 48 g
- Sodium: 120 mg
- Fat: 31 g
- Saturated Fat: 18 g
- Unsaturated Fat: 12 g
- Trans Fat: 0.5 g
- Carbohydrates: 54 g
- Fiber: 1 g
- Protein: 5 g
- Cholesterol: 95 mg
Logan Lemaster
Founder & Culinary Innovator
Expertise
Recipe Development and Innovation, Menu Design and Optimization, Fine Dining Techniques, Ingredient Pairing and Flavor Science
Education
Metropolitan Culinary Arts Institute
Logan’s culinary journey kicked off in his vibrant Chicago family kitchen, where fresh, seasonal ingredients and bold flavors were always front and center.
After graduating from the Metropolitan Culinary Arts Institute in Arlington, Virginia, and honing his skills in renowned restaurants, Logan mastered the art of blending classic techniques with exciting, modern twists.
His kitchen is a dynamic lab for flavor exploration. Through Yum Utopia, Logan aims to empower you to cook with both confidence and creativity, turning simple ingredients into spectacular meals.