
Peanut Butter Brownie Swirl Cookies Recipe for Chocolate Lovers
Peanut butter brownie swirl cookies combine two beloved desserts into one impressive treat that satisfies multiple cravings at once.
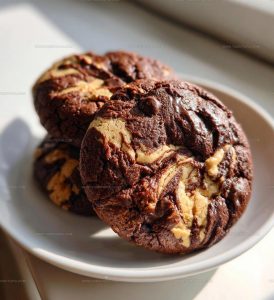
Rich chocolate meets creamy peanut butter in a handheld form that feels both familiar and exciting.
The marbled appearance alone makes them stand out on any dessert table, while the flavor combination keeps everyone coming back for more.
Perfect for potlucks, bake sales, or casual gatherings, they have a way of disappearing quickly.
The texture strikes a beautiful balance between fudgy and chewy, creating an eating experience that feels special without being fussy.
When you need something that looks as good as it tastes, this recipe provides every single time.
They’re simple enough for weeknight baking yet impressive enough for celebrations.
Reasons to Try Peanut Butter Brownie Swirl Cookies
What Makes Peanut Butter Brownie Swirl Cookies
Main Ingredients:Supporting Ingredients:Full Baking Tools for Peanut Butter Brownie Swirl Cookies
How to Swirl Peanut Butter Brownie Cookies
Prepare Oven
Heat the oven to exactly 350 degrees Fahrenheit. Grab a baking sheet and line it with parchment paper so your cookies won’t stick.
Mix Sugars and Peanut Butter
Grab a large mixing bowl and combine these ingredients thoroughly:
Blend until the mixture looks smooth and creamy, with no sugar lumps hanging around.
Add Wet Ingredients
Crack 2 large eggs into the sugar mixture and pour in 1 teaspoon vanilla extract. Whisk everything together until completely combined and looking glossy.
Create Cookie Base
Sprinkle these dry ingredients into your wet mixture:
Stir gently just until everything comes together – don’t overmix or your cookies will get tough.
Prepare Brownie Swirl
Take 1 cup of prepared brownie batter and drop small spoonfuls across the top of your cookie dough.
Create Beautiful Swirls
Use a knife to gently drag through the brownie batter and cookie dough, creating gorgeous marbled patterns. Don’t mix too much – you want distinct swirls.
Scoop and Bake
Drop rounded spoonfuls of the swirled dough onto your prepared baking sheet, leaving about 2 inches between each cookie.
Bake to Perfection
Slide the baking sheet into the 350-degree oven and bake for exactly 10-12 minutes. The edges should look set but the centers might seem slightly soft.
Cool and Enjoy
Let the cookies rest on the baking sheet for 5 minutes, then transfer to a wire rack. This helps them firm up without overcooking.
Kitchen Insights for Peanut Butter Brownie Swirl Cookies
Peanut Butter Brownie Swirl Cookie Variations To Bake
Rich Serving Tips for Peanut Butter Brownie Swirl Cookies
How to Store Peanut Butter Brownie Swirl Cookies
Peanut Butter Brownie Swirl Cookies Q&A
Can I use natural peanut butter?
Natural peanut butter separates easily and might change the cookie texture. Stick with traditional creamy peanut butter for best results.
How do I get the perfect swirl effect?
Use a sharp knife and drag it gently through the brownie and cookie dough, creating delicate figure-eight patterns without overmixing.
What if my dough seems too soft?
Chill the dough for 15-20 minutes in the refrigerator before scooping onto your baking sheet. Cold dough helps prevent spreading.
Can these cookies be frozen?
Absolutely! Wrap each cooled cookie individually in plastic wrap, then store in a freezer bag for up to 3 months.
Do I need special baking equipment?
A standard baking sheet and parchment paper work perfectly. No fancy tools required for these delicious cookies.
Are these cookies good for gift-giving?
These swirl cookies look impressive and taste amazing, making them an excellent homemade gift for friends and family.
Swirled Peanut Butter Brownie Cookies Recipe
- Total Time: 20-22 minutes
- Yield: 12 1x
Description
Peanut Butter Brownie Swirl Cookies blend two classic favorites into one delightful treat that’ll make your taste buds dance. Swirling rich chocolate brownie batter with creamy peanut butter creates a mouthwatering cookie perfect for sharing with friends and family.
Ingredients
Primary Ingredients:
- 1 cup peanut butter
- 1 cup brownie batter
- 2 large eggs
- ½ cup all-purpose flour
Supporting Ingredients:
- 1 cup brown sugar
- ½ cup granulated sugar
Finishing Ingredients:
- 1 teaspoon vanilla extract
- ¼ teaspoon baking soda
- ¼ teaspoon salt
Instructions
- Warm your oven to 350F and grab a baking sheet.
- Blend 1 cup peanut butter with 1 cup brown sugar and ½ cup granulated sugar until silky smooth.
- Crack 2 large eggs and pour in 1 teaspoon vanilla extract. Mix thoroughly until ingredients are fully incorporated.
- Gently fold in ½ cup flour, ¼ teaspoon baking soda, and ¼ teaspoon salt. Stir until just combined.
- Dollop prepared brownie batter across your cookie mixture in random spoonfuls.
- Take a knife and create artistic swirls, blending brownie batter into cookie dough without completely mixing.
- Scoop tablespoon-sized portions of the swirled dough onto your prepared baking sheet, spacing them 2 inches apart.
- Slide the sheet into the 350F oven and bake precisely 10-12 minutes until edges look set and centers appear slightly soft.
- Remove from oven and let cookies rest directly on the baking sheet for 5 minutes to firm up.
- Transfer cookies to a wire cooling rack using a spatula, allowing them to cool completely before serving.
Notes
- Chill the dough for 30 minutes before baking to prevent spreading and help the swirl pattern stay distinct.
- For a gluten-free version, swap regular flour with a cup-for-cup gluten-free baking blend that maintains the cookie’s soft texture.
- Ensure your brownie batter isn’t too runny when swirling, or it will blend completely into the cookie dough instead of creating a marbled effect.
- Store cookies in an airtight container at room temperature for up to 5 days, separating layers with parchment paper to preserve their shape and prevent sticking.
- Prep Time: 10 minutes
- Cook Time: 10-12 minutes
- Category: Cookies
- Method: Baking
- Cuisine: American
Nutrition
- Serving Size: 12
- Calories: 204 kcal
- Sugar: 15 g
- Sodium: 98 mg
- Fat: 12 g
- Saturated Fat: 3 g
- Unsaturated Fat: 7 g
- Trans Fat: 0 g
- Carbohydrates: 20 g
- Fiber: 2 g
- Protein: 6 g
- Cholesterol: 31 mg
Logan Lemaster
Founder & Culinary Innovator
Expertise
Recipe Development and Innovation, Menu Design and Optimization, Fine Dining Techniques, Ingredient Pairing and Flavor Science
Education
Metropolitan Culinary Arts Institute
Logan’s culinary journey kicked off in his vibrant Chicago family kitchen, where fresh, seasonal ingredients and bold flavors were always front and center.
After graduating from the Metropolitan Culinary Arts Institute in Arlington, Virginia, and honing his skills in renowned restaurants, Logan mastered the art of blending classic techniques with exciting, modern twists.
His kitchen is a dynamic lab for flavor exploration. Through Yum Utopia, Logan aims to empower you to cook with both confidence and creativity, turning simple ingredients into spectacular meals.