
Classic Apple Pie Recipe For Every Season
A classic apple pie recipe connects generations around tables where warmth and conversation flow as freely as laughter.
There’s something magical about fruit tucked inside flaky pastry that makes any occasion feel special, whether it’s a quiet Tuesday or a celebration with loved ones.
Bakers everywhere have relied on this beloved dessert to create moments of pure comfort and joy.
The aroma alone has a way of making a house feel like home, drawing people into the kitchen with anticipation.
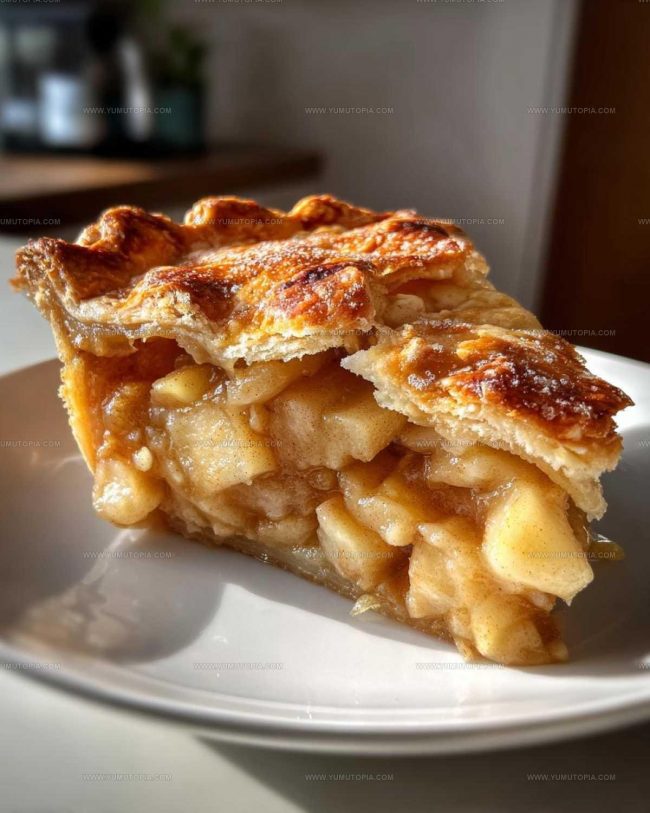
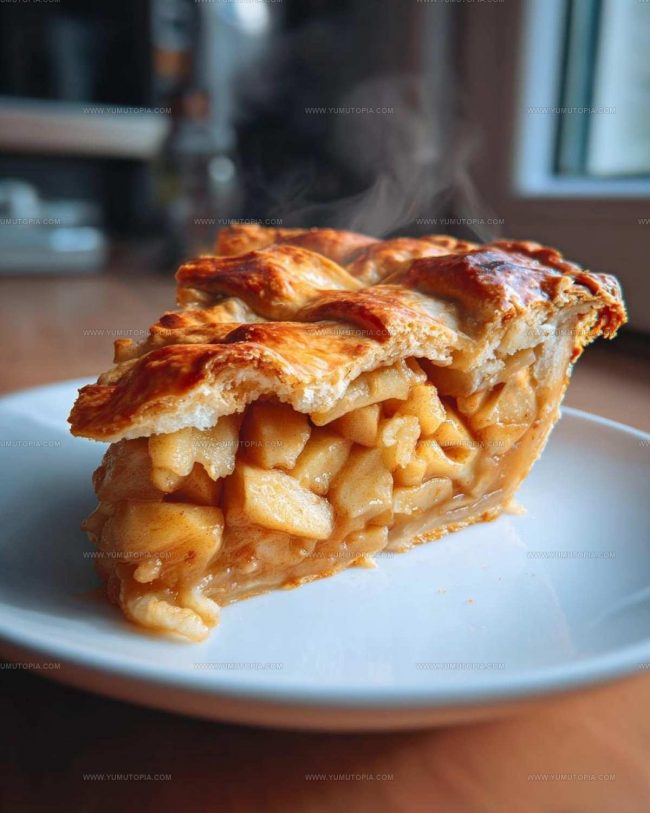
Each slice delivers that perfect balance of sweet and spiced flavors wrapped in golden, buttery layers.
When you need a dessert that feels both familiar and impressive, this American staple never disappoints.
Few things rival the satisfaction of serving a homemade pie that looks beautiful and tastes even better.
Time to bake something that’ll have everyone asking for seconds.
Reasons This Classic Apple Pie Is Pure Seasonal Bliss
Fruit-Filled Elements Of Soft Blueberry Muffins
Pie Crust:Main Filling Ingredients:Sweetening and Spice Ingredients:Binding and Enhancing Ingredients:Finishing Ingredients:Rolling Pins Dishes And Tools Needed For Apple Pie Prep
How To Assemble a Classic Apple Pie from Scratch
Warm Up the Oven
Crank your oven to a toasty 425°F (220°C). This high temperature helps create that golden, flaky crust your family will adore.
Prepare the Crust
Roll out your favorite pie crust recipe. Make sure your bottom crust fits snugly into a 9-inch pie dish with a bit of overhang.
Mix Apple Filling
Grab a large mixing bowl and toss together:
Stir gently until every apple slice gets coated with the sweet spice mixture.
Fill the Pie Crust
Pour the apple mixture into your prepared bottom crust. Spread the apples evenly, making sure they’re packed nicely.
Add Butter Dots
Scatter 2 tablespoons of small butter pieces across the top of the apple filling. These little butter dots add richness to your pie.
Cover with Top Crust
Lay the top crust over the apples. Crimp the edges together and cut a few small vents to let steam escape.
Create Egg Wash
Whisk 1 large beaten egg with 1 tablespoon milk. Brush this mixture over the entire top crust for a beautiful golden shine.
Prepare for Baking
Place the pie on a baking sheet to catch any drips. This saves your oven from messy spills.
First Baking Stage
Bake at 425°F (220°C) for 15 minutes. This initial high heat helps create a crisp bottom crust.
Lower Temperature
Reduce the oven to 375°F (190°C). Continue baking for 35-45 minutes until the crust turns golden and the filling bubbles.
Protect the Crust
If the edges brown too quickly, cover the pie loosely with aluminum foil to prevent burning.
Cool and Set
Let the pie rest on a wire rack for 2-3 hours. This waiting time helps the filling set and makes slicing much easier.
Helpful Tips For A Crisp Crust And Soft Spiced Filling
Pure Bliss Adaptations for Classic Apple Pie
Serving Classic Apple Pie Warm With Ice Cream
Storing Apple Pie For Another Day’s Treat
Apple Pie Questions People Ask Every Holiday
Can I use different types of apples?
Absolutely! Mix tart Granny Smith with sweet Honeycrisp for a balanced flavor. Avoid very soft apples that will turn mushy during baking.
How do I prevent a soggy bottom crust?
Sprinkle a thin layer of breadcrumbs or ground nuts on the bottom crust before adding filling. This helps absorb extra moisture and keeps your crust crisp.
What if my pie crust edges are burning?
Cover the edges with aluminum foil strips or a pie shield to protect them from excessive browning while the center continues baking.
Why should the pie cool completely before cutting?
Allowing the pie to cool helps the filling set and thicken. Cutting too soon means your slices will be runny and fall apart.
Can I make this pie ahead of time?
Definitely! Prepare the pie and refrigerate unbaked, or bake and store at room temperature for 1-2 days. Reheat slices in the oven for best texture.
How can I tell if the pie is fully baked?
Look for a golden brown crust and bubbling filling around the edges. The apples should be tender when pierced with a knife through the vent holes.

Traditional Double-Crust Apple Pie Recipe
- Total Time: 2 hours 70 minutes – 3 hours 20 minutes
- Yield: 8 1x
Description
Classic Apple Pie from my grandma’s kitchen brings together crisp autumn apples, warm spices, and a buttery homemade crust that whispers comfort. Baking this pie fills your home with sweet memories and connects generations through one delicious slice of golden-brown goodness.
Ingredients
Main Ingredients:
- 6 cups thinly sliced peeled apples
- 1 recipe for double pie crust
Filling Enhancers:
- ¾ cup granulated sugar
- 2 tablespoons all-purpose flour
- 1 teaspoon ground cinnamon
- ¼ teaspoon ground nutmeg
- ¼ teaspoon salt
- 2 tablespoons unsalted butter
Egg Wash:
- 1 large egg
- 1 tablespoon milk
Instructions
- Heat your oven to a sizzling 425°F (220°C), setting the stage for a perfect golden-brown pie.
- Roll out your double pie crust, ensuring a smooth, even surface for your delectable creation.
- Slice 6 medium apples into thin, uniform pieces, creating a delightful canvas of fruit.
- Toss the apple slices with ¾ cup granulated sugar, 2 tablespoons flour, 1 teaspoon cinnamon, ¼ teaspoon nutmeg, and ¼ teaspoon salt in a large mixing bowl.
- Gently spread the seasoned apple mixture into the bottom pie crust, creating an even layer of fruity goodness.
- Sprinkle 2 tablespoons of small butter pieces across the apple filling, ensuring a rich, creamy texture.
- Carefully drape the top crust over the filling, sealing the edges by crimping them together with your fingers.
- Carve several decorative vents into the top crust using a sharp knife, allowing steam to escape.
- Whisk 1 large egg with 1 tablespoon milk to create a glossy egg wash.
- Brush the egg wash evenly over the top crust, giving it a beautiful golden sheen.
- Place the pie on a baking sheet to catch any potential drips and protect your oven.
- Bake for 15 minutes at the initial 425°F (220°C), creating a crisp crust foundation.
- Reduce the oven temperature to 375°F (190°C) and continue baking for 35-45 minutes.
- If the crust browns too quickly, loosely cover it with aluminum foil to prevent burning.
- Remove the pie and let it cool on a wire rack for 2-3 hours, allowing the filling to set perfectly before slicing and serving.
Notes
- Use apples that are firm and slightly tart, like Granny Smith or Honeycrisp, for the best texture and flavor balance in your pie.
- Allow the pie to rest completely before cutting to ensure the filling sets and doesn’t run, giving you clean, beautiful slices.
- For a gluten-free version, swap traditional flour with a cup-for-cup gluten-free flour blend and use a gluten-free pie crust recipe.
- Brush the crust with egg wash just before baking to create a beautiful golden-brown shine and help the sugar sprinkled on top caramelize nicely.
- Prep Time: 20 minutes
- Cook Time: 50-60 minutes
- Category: Pies
- Method: Baking
- Cuisine: American
Nutrition
- Serving Size: 8
- Calories: 320 kcal
- Sugar: 26 g
- Sodium: 180 mg
- Fat: 15 g
- Saturated Fat: 6 g
- Unsaturated Fat: 8 g
- Trans Fat: 0.2 g
- Carbohydrates: 44 g
- Fiber: 3 g
- Protein: 3 g
- Cholesterol: 40 mg
Madison Wyman
Recipe Developer & Food Storyteller
Expertise
Recipe Research and Adaptation, Food Writing and Cultural Storytelling, Sustainable and Ethical Sourcing, Dietary Adaptations (e.g., gluten-free, plant-based)
Education
Oregon Health & Science University
Portland Community College
Madison’s passion for flavor and culture ignited amidst the rich Southern cooking traditions of her upbringing, where cherished family recipes told delicious tales.
Armed with a Master’s in Food Systems and Society from Oregon Health & Science University and a Culinary Arts Certificate from Portland Community College, Madison truly excels at transforming rich, intricate flavors into dishes that are both approachable and heartfelt.
For her, cooking is a vibrant blend of science, art, and heritage – a powerful way to connect us to our roots and each other. Her recipes invite you to delve deeper, uncovering the fascinating stories woven into every ingredient.