
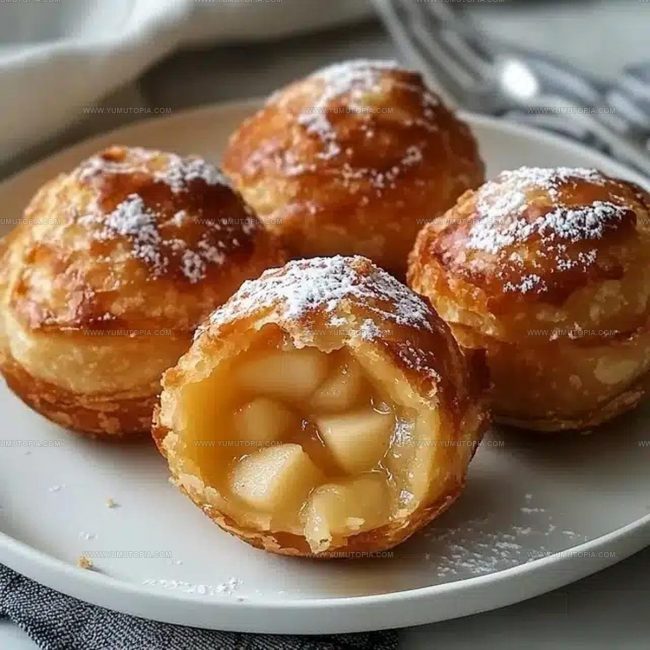
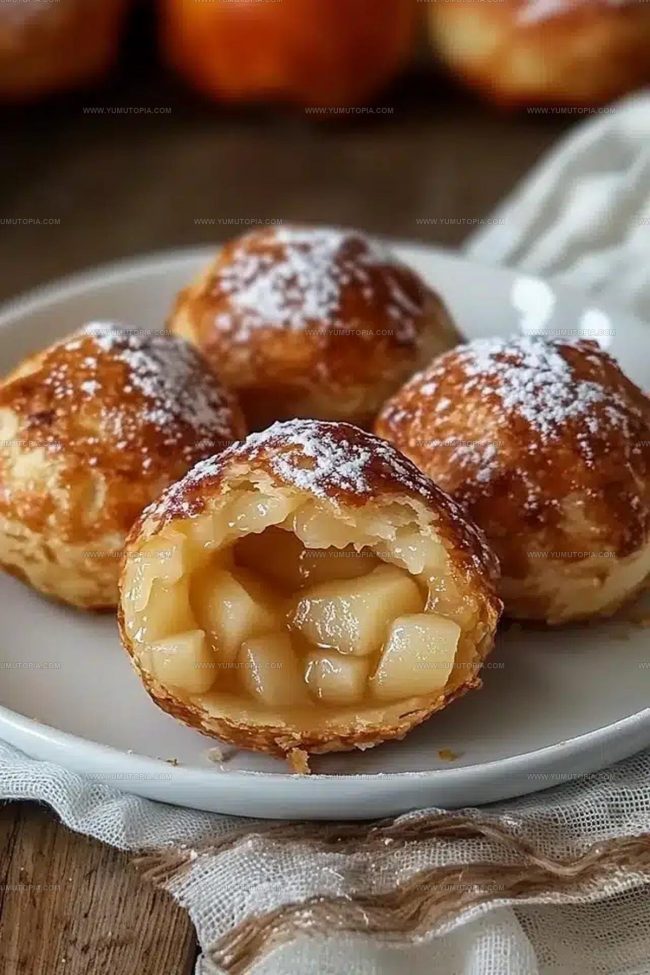
Buttery Apple Pie Bombs Recipe for Sweet Dessert Bites
Warm apple pie bombs deliver all the cozy comfort of traditional dessert in a fun, bite-sized format that everyone will love.
These little treats bring sweetness and warmth to any gathering, whether you need something special for a casual afternoon or want to surprise guests with something delightful.
The handheld nature makes them perfect for parties, potlucks, or simply enjoying on the couch during movie night.
Each golden bite offers that familiar taste of home-baked goodness without requiring hours in the kitchen.
They work beautifully as a quick dessert solution when time is limited but you still want to serve something memorable.
The appeal crosses generations, making them a crowd-pleaser at virtually any occasion.
Start baking these delicious morsels today and watch them disappear within minutes.
Secrets To The Addictive Sweetness Of These Apple Pie Bombs
Sweet Elements Inside These Tasty Apple Pie Bombs
Tools Helping Shape And Bake Apple Pie Bombs
Steps Producing Soft Apple Pie Bombs

Prepare Baking Station
Preheat your oven to 375°F (190°C). Line a baking sheet with parchment paper so nothing sticks when baking. This simple step makes cleanup a breeze.
Prep the Biscuit Dough
Open the can of refrigerated biscuit dough and separate each biscuit. If they seem thick, gently flatten them with your hands to create wider circles that will wrap around the apple filling easily.
Chop Apple Filling
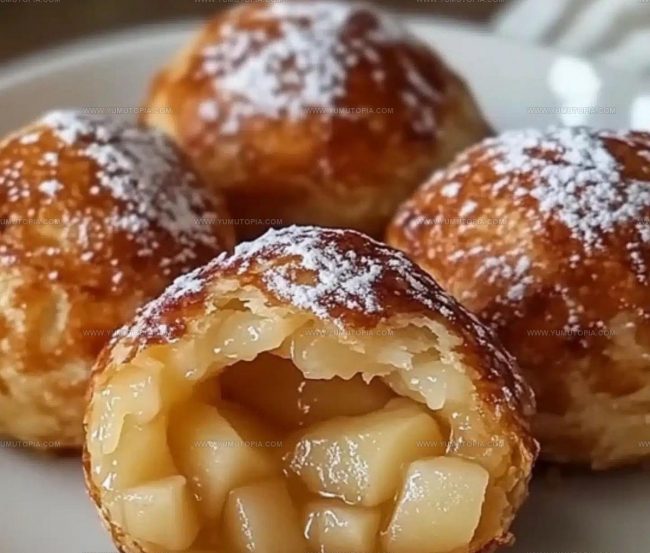
Break down your apple pie filling into smaller pieces. Smaller chunks mean each bite will have a perfect mix of dough and fruity filling. Use a knife to cut the filling into tiny, manageable bits.
Fill the Dough
Place the chopped apple filling in the center of each biscuit circle. Be careful not to overfill – about 1 tablespoon (15 ml) works perfectly. Too much filling will cause leaks during baking.
Seal the Bombs
Carefully fold the edges of the dough over the apple filling. Pinch the edges together firmly to create a complete seal. Gently roll each bomb between your palms to form a smooth, round shape.
Prepare for Baking
Arrange the sealed Apple Pie Bombs on the prepared baking sheet with the sealed side facing down. Space them about 2 inches (5 cm) apart to allow even browning.
Butter and Coat
Brush each bomb with 2 tablespoons (30 ml) of melted unsalted butter. This helps create a beautiful golden exterior and helps the coating stick.
Create Cinnamon Sugar Coating
In a small bowl, mix ¼ cup (50 g) granulated sugar with 1 teaspoon ground cinnamon. This sweet, spicy mixture will give your bombs an extra layer of flavor.
Bake to Golden Perfection
Place the baking sheet in the preheated oven. Bake for 12-15 minutes until the bombs puff up and turn a gorgeous golden brown. Check them at the 12-minute mark to prevent overcooking.
Add Final Touch
As soon as the bombs come out of the oven, roll each one in the cinnamon-sugar mixture. The warm butter helps the coating stick perfectly, creating a delightful crisp exterior.
Cool and Serve
Let the Apple Pie Bombs cool for a few minutes – the filling will be extremely hot! Serve them warm with a scoop of vanilla ice cream or a drizzle of caramel sauce for an extra special treat.
Finishing Touches That Improve Apple Pie Bomb Flavor
Creative Apple Pie Bomb Variations

Serving Tips For Warm And Crispy Apple Pie Bombs
Ways To Keep Apple Pie Bombs Tender
Apple Pie Bomb Questions Frequently Raised
Can I use homemade biscuit dough instead of canned?
Absolutely! Homemade biscuit dough works great and gives your Apple Pie Bombs a more personal touch. Just ensure the dough is rolled thin enough to wrap around the filling.
What if my apple pieces are too large?
Chop the apple filling into smaller, bite-sized pieces. Smaller chunks help the filling distribute evenly and prevent big gaps inside the bomb.
How do I prevent the filling from leaking?
Seal the edges carefully by pinching the dough together firmly. Roll the bomb gently in your hands to smooth out any potential weak spots that might cause leaks.
Can I make these ahead of time?
Yes! Prepare the bombs and refrigerate them before baking. When ready, brush with butter and bake straight from the refrigerator. Add a few extra minutes to the baking time.
Are there alternative fillings I could use?
Definitely! Try cherry, peach, or even a cream cheese mixture. Just keep the filling consistent and not too liquid to maintain the bomb’s structure.

Warm Apple Pie Bombs Recipe
- Total Time: 27-30 minutes
- Yield: 8 1x
Description
Grandma’s Apple Pie Bombs bring pure comfort straight from a Southern kitchen to your plate. Warm cinnamon-kissed apple filling wrapped in golden pastry creates a delightful treat that connects generations of bakers with sweet, nostalgic memories.
Ingredients
Main Ingredients:
- 1 can refrigerated biscuit dough
- 1 cup apple pie filling
Coating and Seasoning:
- ¼ cup granulated sugar
- 1 teaspoon cinnamon
Additional Ingredients:
- 2 tablespoons unsalted butter
Instructions
- Warm your oven to 375°F (190°C). Cover a baking sheet with parchment paper to prevent sticking.
- Separate each refrigerated biscuit. Gently flatten the dough into slightly larger circles using your hands.
- Chop the apple pie filling into small, uniform pieces to ensure easy filling distribution.
- Carefully place 1 tablespoon of chopped apple filling directly in the center of each biscuit circle.
- Fold the dough edges over the apple filling, pinching them tightly to create a sealed pocket. Roll between your palms to form a smooth round ball.
- Position each sealed apple pie bomb seam-side down on the prepared baking sheet, leaving space between them.
- Brush each bomb with ½ tablespoon melted unsalted butter, ensuring complete coverage for a golden exterior.
- Bake for 13-15 minutes until the bombs puff up and turn golden brown. Watch closely to prevent burning.
- Combine ¼ cup granulated sugar and 1 teaspoon cinnamon in a small mixing bowl.
- While bombs are still warm, roll each one completely in the cinnamon-sugar mixture for even coating.
- Allow bombs to cool for 3-4 minutes before serving. Optional: Complement with vanilla ice cream or caramel drizzle.
Notes
- Chill the dough for at least 30 minutes to ensure a flaky, tender crust that won’t shrink during baking.
- Use cold butter and handle the dough minimally to prevent tough pastry and maintain those delicate layers.
- Select firm, tart apples like Granny Smith or Honeycrisp that hold their shape and provide a nice balance to the sweetness.
- For a gluten-free version, swap regular flour with a cup-for-cup gluten-free blend and ensure all other ingredients are certified gluten-free.
- Prep Time: 15 minutes
- Cook Time: 12-15 minutes
- Category: Pies
- Method: Baking
- Cuisine: American
Nutrition
- Serving Size: 8
- Calories: 230 kcal
- Sugar: 15 g
- Sodium: 300 mg
- Fat: 11 g
- Saturated Fat: 5 g
- Unsaturated Fat: 4 g
- Trans Fat: 0.2 g
- Carbohydrates: 29 g
- Fiber: 1.5 g
- Protein: 3 g
- Cholesterol: 20 mg
Madison Wyman
Recipe Developer & Food Storyteller
Expertise
Recipe Research and Adaptation, Food Writing and Cultural Storytelling, Sustainable and Ethical Sourcing, Dietary Adaptations (e.g., gluten-free, plant-based)
Education
Oregon Health & Science University
Portland Community College
Madison’s passion for flavor and culture ignited amidst the rich Southern cooking traditions of her upbringing, where cherished family recipes told delicious tales.
Armed with a Master’s in Food Systems and Society from Oregon Health & Science University and a Culinary Arts Certificate from Portland Community College, Madison truly excels at transforming rich, intricate flavors into dishes that are both approachable and heartfelt.
For her, cooking is a vibrant blend of science, art, and heritage – a powerful way to connect us to our roots and each other. Her recipes invite you to delve deeper, uncovering the fascinating stories woven into every ingredient.